Valentine Heart Activities for the Kids, with a side of FAIL!

Standard
Valentine Heart Activities for the Kids, with a side of FAIL!

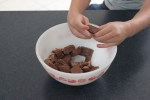
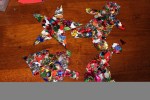
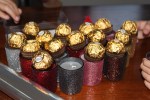
The concept here is very simple, so the results are totally worth it. Gather up any old crayons, or you could even buy new ones if you like, but with 4 kids in the house, we have plenty of old odd sets.  Let the kids remove the paper (strengthening fine motor skills for the win!) and snap or cut into small enough pieces to fit in your desired mould.  *make sure your mould is heat proof!

IMG_1115
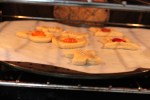
Heat the oven to around 120c, it really doesn’t need to be very hot. Place in the oven on another hard tray (like a pizza tray) because they will be super runny before they set again and you don’t want crayon spilt inside your oven – ask me how I know?   If you do happen to spill a few drops, wipe it off with paper towel straight away, much easier to remove it while its still runny.

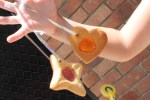
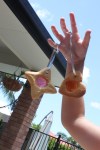
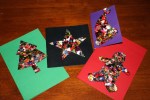
Once they are all fully melted, remove from the oven to cool.  I put them in the fridge after a while, because I am impatient.  Then just press them out of the moulds and you’re done.

IMG_1147

And now for the fail.  Originally I wanted to make crayon rings, for something a bit different on valentines day.  So along with my heart tray, I ordered a ring tray.  We were all set to go and excitedly looking forward to the results.

IMG_1076

But alas, this tray must have been for the freezer only.  I was sitting at my desk and thought ‘what is that smell’ walked to the oven to check and holey smokes!  I opened the door quickly, at which point the lot burst into flames!  So I threw some water on it in my panicked state.  The results?

IMG_1079
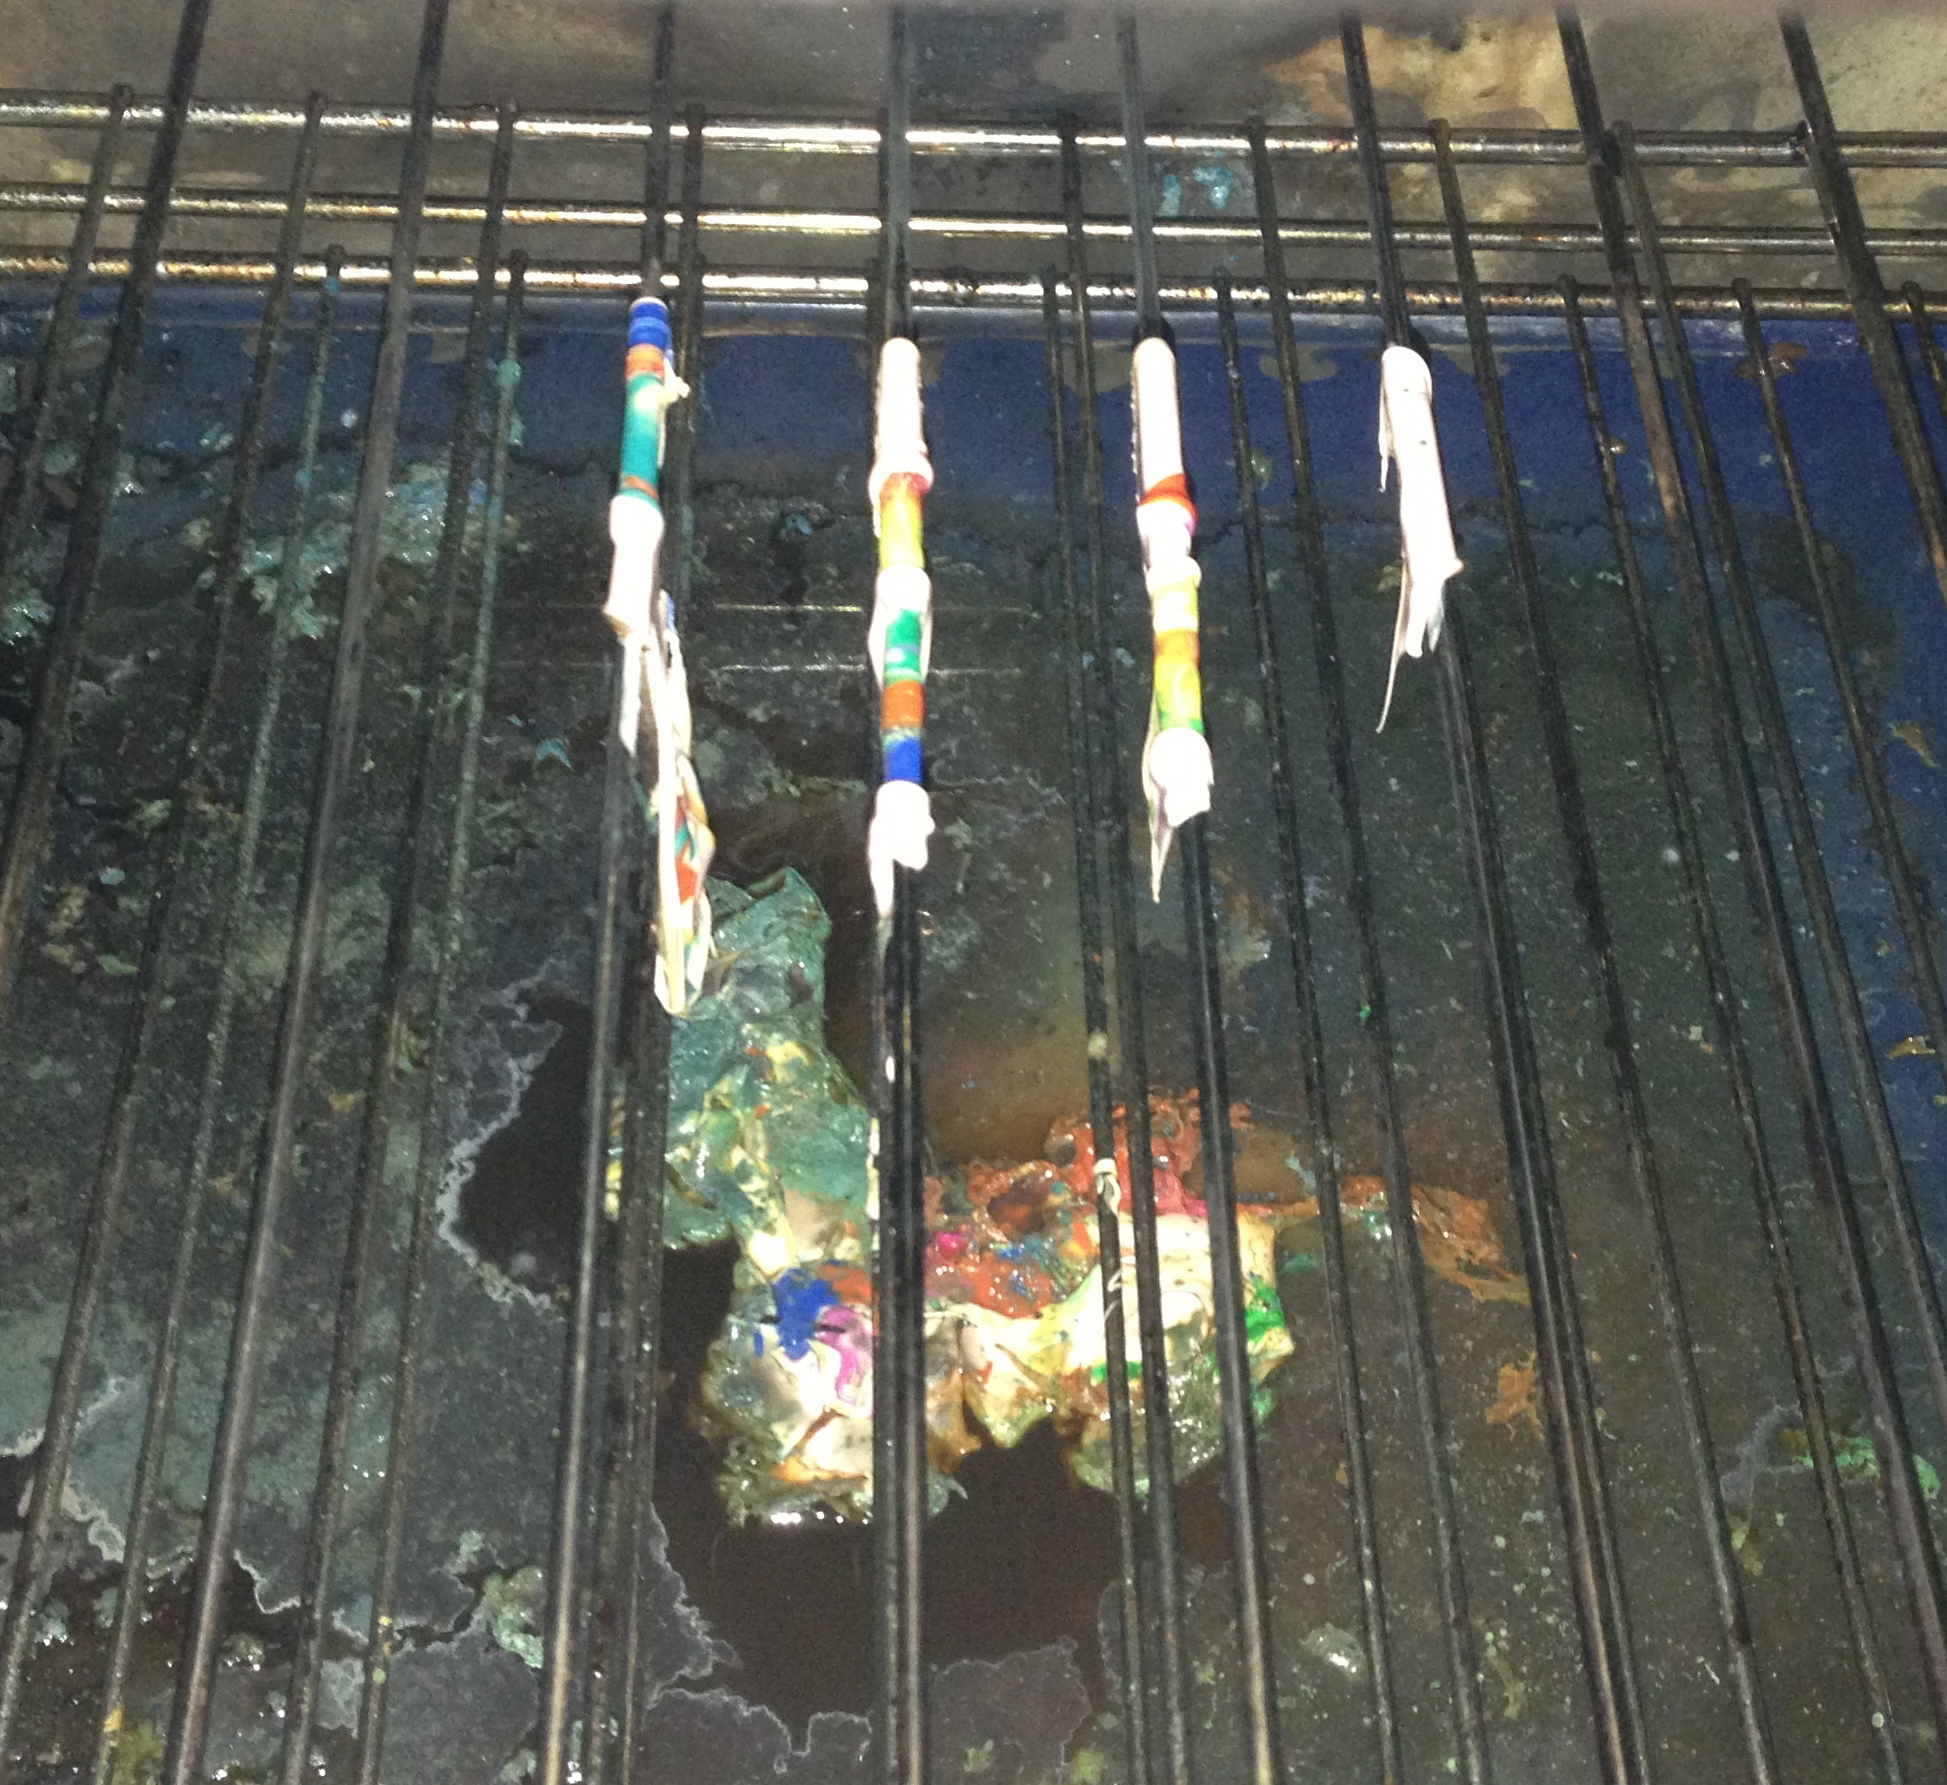
A house full of toxic smoke and a colourful mess to clean up!  Oh dear.  So please, learn from my mistake, make sure you check the temperature ratings!

Valentine Craft for Toddlers

Standard
Valentine Craft for Toddlers

Super quick and easy to set up, minimal mess and cute results.  Bend a cardboard tube, toilet roll for example, and fix the top with some tape to keep its shape.  If you have some heart shape cookie cutters, they will work too.  We also made 2 potato stamps.  Some coloured paper, paint and let them at it.


The potato stamps worked out much better, as neither of the younger 2 had the dexterity required to get the roll to print properly.  You could finish them off and write messages on with a sharpie as I did in the last image, or you could just use them as decorations rather than cards.

Wind Chime / Sun Catcher

Standard
Wind Chime / Sun Catcher

Continuing on from the Christmas decorations we made a few weeks back, using the same principal we put together this wind chime or out door decoration.  I’ll spare too much description, as its all talked about in the previous post (linked above), and its pretty straight forward anyway.

So this time we just made all stars, the kids chose their colour schemes and I wasn’t too worried about a colour theme as such.  More colour the better.  Once cooled, again we drilled small holes into a corner of each one, then threaded some fishing line to hang from a branch.  I used a tiny dot of hot glue to keep the fishing line in position.  And that’s it!  Easy peasy.

This is about the 4th time we have made sun catcher type things, and every.single.time there is no sun when I go to take photos of it.  I will hopefully update this when the some decides to come out again.

Back to School – Book covering, (without the swearing)

Standard
Back to School – Book covering, (without the swearing)

This really doesn’t require a tutorial, its more of a brag than anything.  There is a certain amount of nostalgia attached to covering school books.  The smell of that fresh new paper, shiny new pencils, no dog ears, all your books neat in a row.  Then to personalise them with pretty covers and name labels.  Yes, I looooved coving my books at school – says anyone that doesn’t have school age children.  That was me too, until my eldest son started 1st grade.  BUT THE TRUTH!  The truth is, contact is the DEVIL!  Thats right folks,  he walks among us, in the shape of a cylindrical role of pretty coloured sticky plastic.   What was once a lovely memory of my own child hood, now just about brings tears to my eyes.  I do not remember it ever being to difficult!  The bubbles, THE F’N bubbles, creases, more bubbles, AHHHHHH.  OMG.  So, after 3 years of torturing myself, my partner, and my walls (things were thrown) I finally got out early enough in the back to school season to get my hands on clear plastic sleeves.  There is a God!  He was hiding at Office Works the whole time.   A few rolls of gift wrap from the $2 shop and we are set!

IMG_0834


The boys had 20, yes, 20 writing books EACH this year.  The sleeves come in packs of 5, for around $3 a pack.  3 – 5 meter rolls of wrapping paper, $2 each at the Reject Shop. Scissors and tape.

Wrap the cover of the book just as you would with contact, but secure with sticky tape on the insides.  It took just under an hour to cover all of one child’s books.

IMG_0836


Slide the covers over the top, and you’re done.  (please excuse the revolting nails that badly needed refilling).

IMG_0977


No swearing, no bubbles, no torn covers, no bubbles, no books thrown, no tantrums or tears and more importantly, no bubbles.  Just lovely, shiny clean covered books, ready for the new school year.


Valentine Craft – Hanging hearts Wall/door Decoration

Standard
Valentine Craft – Hanging hearts Wall/door Decoration

I saw something similar to this on Pinterest, thought we would give it a go.  I just used some scrap booking paper we had already, picked out 10 different pink patterns.  Using the paper cutter, cut strips approximately 1 inch wide.  Then folded them in half, ready to be rolled, as demonstrated by Ms 4 below.  The kids did them around a round pencil, but you can also curl them with a blade like you do curling/gift ribbon.  The blade was much quicker, but I was not letting the kids do that.

IMG_6364

Once both sides are curled towards the middle, fix the to sides together in the centre of the heart with a staple.  I didn’t worry to much about a uniform size.  Variety is the spice of life and all that.

You could use a coat hanger, pice of dowel, or even just a long stick for the hanging frame.  We used some mettle light extension rods we had in the shed, kept them thinking they would come in handy some day and looky here, perfect size for a door way!   I decided on 5 strings of 10 hearts, because lets be honest, the novelty was already wearing off making them after the first 10.

IMG_6382

Then came the tricky part, threading them onto the fishing line.  I temporarily hung the rod from a fan so I could manoeuvre around it easier.  Then threaded through the centre of the heart and tied a knot around where it is stapled together, so the line was centre.  THEN, using a needle, threaded the remaining line through the centre at the bottom of the heart, to keep the heart upright.  Thankfully putting fishing line through a needle is very easy!  The threading process probably took 10 minutes for each strand.  To finish off, I hung some sparkly gift ribbon between each row.  And there you have it!

IMG_6388

IMG_6396

This slideshow requires JavaScript.

Beaded Mobile/Chandelier/Wind chime Family project.

Standard
Beaded Mobile/Chandelier/Wind chime Family project.

Sorry if the beads are getting old.  I really made this up as I went along. I wanted to use the rings I had bought to make Christmas Wreaths but never got around to.   I thought this was something we could all do together and the results are pretty cute, although would do it differently next time.


Ending the wire


We threaded some plastic jewels with beading wire, to make the ends. Then created patterns with different coloured beads, around 20cm long.

ends ready for string


Finish off the ends by wrapping the wire into a loop around some needle nose pliers.  The loop needs to be big enough to not let the beads slide off, and to allow you to thread more string on in the next step.

Then I just tied them around the ring, suspended it with some gift ribbon and suspended a glass sun catcher in the middle.  All pretty straight forward. Ms 4 wants to hang it from her light, but as she has a light fan combo, there is nothing to hang it from.


IMG_0991


This slideshow requires JavaScript.


Christmas Decorations, Easy Toddler Activity

Standard
Christmas Decorations, Easy Toddler Activity

These really are too easy and turned out so well!  I will be using this concept for some other projects as soon as more cookie cutters arrive.

IMG_0903

We used a tupperware baking sheet under them, but I think any flexible non stick surface would do, (baking paper).  Simply fill some metal or oven proof cookie cutters or moulds roughly 2 layers deep, and bake at around 180c.  Keep an eye on them until they are all melted.  The plastic beads we used did not emit any nasty smell and did not burn, even when I got impatient and turned the over up to 200c, however, make sure the area is well ventilated just to be on the safe side.

IMG_0905

Try to pile the beads up in the middle slightly, but only leave them 1 high at the edges, to avoid any bits sticking to the sides higher than other areas (you can see where this happened on the small man) Once cooled, remove the cutter and there you have it.  I ran cool water over them to cool them a bit faster and this didn’t damage the shiny finish at all.

The husband drilled some holes in the top for string, and there you have it.

IMG_0910

We will make a stack of smaller Christmas coloured ones for the trees next year.

This slideshow requires JavaScript.

Memory Wire Bracelets, School holiday and Toddler Activity

Standard
Memory Wire Bracelets, School holiday and Toddler Activity

Beading is hardly new as a way to entertain the kids and improve fine motor skills, but I have never let them try it with memory wire before.  For those who don’t know what that is, Memory wire is tempered wire that “remembers” its shape and retains its coiled form.  You can pick it up really cheap on ebay and then just cut to desired length as required.  Due to the fact its wire rather than thread, it also makes it much easier for the little ones to get the beads on.


IMG_0891


Once cut to length, just turn the end over with some needle nose pliers into a loop big enough that it wont allow your chosen beads to slip over, or in the case of really big beads, as I have done above, making sure no sharp ends will dig into their little arms.

The kids just made single loops today.  Mr 7 experimented with patterns and Miss 4 went random.


IMG_0895


This slideshow requires JavaScript.


Giraffe Softie – Or at least some kind of long necked creature.

Standard
Giraffe Softie – Or at least some kind of long necked creature.

Here is another.  Because I had worked out the way to do the leg insert from the elephant.  I figured I’d give it a go free hand.


IMG_0332


Cut out both sides and the leg insert.  Plus a leaf shape for the head insert to create a 3rd dimension.

IMG_0334


I started sewing from under the chin and worked my way around leaving the neck open to add the mane, ears and antlers and of course stuff the body.  The mane needs to be put in before turning it inside out.  It was a little fiddly, but I am happy with the results.   I stuffed the antlers to  make them stand up on their own.   You can see below where I have sewn the head pieces together with the antler (in red) on the inside, so its positioned correctly when turned in the right way.

IMG_0373There ended up being a lot going on in the head area.  This would have been easier had I made the head bigger.  He would have also ended up with a more realistic length nose!  We live and learn.

IMG_0378

This slideshow requires JavaScript.

Elephant Softie – Rainy Day Activity

Standard
Elephant Softie – Rainy Day Activity

I dont know if I have ever mentioned here before my love of elephants?  Anyway, I think they are very awesome animals, and elephant toys are the cutest.  I actually made this a while ago, but never got around to blogging about it.  I have been soooo slack this school holidays, so this is my token effort for the week.

I just googled elephant softie pattern until I found something that looked simple enough.  I copied the image, pasted into a word doc and blew up as big as I could.  Printed it out and stuck it all together again!

IMG_5706

The kids helped cut out all the pieces, pin them to the fabric and cut out the fabric.  Then it was sewing time.

I really didn’t take enough photos through this process, but it was all very straight forward.  The line across the middle is the piece you need to make for the inside of the legs.  You can see this piece folded over in the image below.

IMG_5707

IMG_0202

Now here is a hint – make sure you put the eyes on BEFORE you finish sewing it.  Because this little guy is now getting around the house blind, as I couldn’t put the backs on his eyes!

Anyway, we love the little blind guy. I want to make a whole herd!

This slideshow requires JavaScript.

Easy Toddler Craft, Christmas Reindeer

Standard
Easy Toddler Craft, Christmas Reindeer

How cute are these?  Mr 7s year 6 buddy made him one for Christmas.  I had to give them a go with the little ones.

Super simple and we had everything lying around the house (I will admit I do buy wooden pegs just for craft, they are not much good for hanging out washing!)

IMG_6122

We started off painting them assembled, but that was just silly.  Paint all the bits first, THEN assemble once they are dry.

IMG_6126Add some eyes, a red nose and some pipe cleaner antlers.

IMG_6128

We even made a baby one with the mini craft pegs and mini paddle pop sticks.

IMG_6131

Classic Christmas Cooking – Window Biscuit Decorations

Standard
Classic Christmas Cooking – Window Biscuit Decorations

IMG_6117

I helped the kids in Mr 8s class make these at school, so thought we would give them a try at home.  There is heaps of different recipes out there, so you can really make them any flavour you wants, but you want to choose a biscuit that doesn’t rise too much.   We used a basic butter biscuit recipe.

  • 125g butter, softened
  • 1/2 cup caster sugar
  • 1/2 teaspoon vanilla extract
  • 1 egg, at room temperature
  • 2 cups plain flour
  • 1/2 teaspoon of baking soda.

I also added a sprinkle of cinnamon and all spice.  I probably don’t need to tell you how to make biscuits.  To be honest, they rose a little more than I would have liked, so might use a different recipe next time.  The recipe also started with the usual ‘pre-heat oven’, but after mixing the ingredients you had to put the dough into the fridge for 45 minutes.  What a waste of electricity having your oven running all that time?

IMG_6104

Use any shapes you like, then a smaller shape inside.  Pop a hard lolly (boiled lolly or jolly rancher etc) into the centre and bake on some baking paper at around 180 for only a few minutes.  The lolly will melt in the time it takes to cook the biscuit.  So simple.

IMG_6119

If you live in an area of the world that is humid, these wont last long on the tree.  So just eat them!

This slideshow requires JavaScript.

Sweet Christmas Treats – Mars Bar Crackles.

Standard
Sweet Christmas Treats – Mars Bar Crackles.

These are a really easy alternate to the traditional chocolate crackles. They are not as sickly sweet either, so adults can enjoy them.

IMG_6091

All you need is 2 table spoons of cream (some recipes say thin cream, but either works) 200 or more grams of Mars Bars  Rice bubbles (home brand will be fine) and thats it.  I also add chocolate drops and coconut for some different textures, but that is not at all necessary.

IMG_6093

Break up the bars and add the cream (I also added coconut at this stage).  Microwave in 30 second bursts, stirring at each interval to avoid hot spots (burnt chocolate).  Once its all runny, you can either add the rice bubbles directly, or poor into another bowl that has the rice bubbles in it.  This actually works better as its easier to distribute and you don’t end up with a heap of chocolate stuck to the bottom of the bowl.

Allow to cool slightly (you can put it in the fridge) so that you can roll the mix into balls.  When its hot its just too sticky and you can’t get it off your hands.  If you are going to add extra chocolate drops, do it when the mixture is cooler so they don’t melt.

IMG_6098

Home Made Christmas Cards – Kids Craft

Standard
Home Made Christmas Cards – Kids Craft

Unlike most of our projects, where I get inspired by Pinterest or something else,  I actually thought this up myself!

IMG_6083

Really easy messy fun for all ages.  Just take some coloured paper and draw some simple Christmas shapes.  If drawing is not your thing, trace around some cookie cutters.

Basic Christmas Shapes

Cover inside the outline with a thick layer of craft glue.  Smear around with a paintbrush or a finger tip if you don’t mind getting sticky.

IMG_0686

Then sprinkle christmas theme sequins randomly over the glued area.  Try to cover the outline as much as possible too.

IMG_0690

When you can’t see much of the paper within the shape, give it a light shake.  Then drizzle some more glue over the top to hold down any loose ones.

IMG_0691

Allow to dry.  We left them for 24 hours.

IMG_0700

Once dry, Use some large sharp scissors, cut around the shape.  If you can’t see the outline on the front, just follow the lines that went through the page as demonstrated above.

IMG_0703

Once the shapes are cut out, we added some double sided mounting tape (commonly used for scrap booking) to give them a slightly more 3D effect on the card, but you could just use standard double sided tape or glue.

IMG_6086

Position on the cards as you please, and there you have it.  Sparkly Christmas cards.  Mini ones of these would also make cute Gift Tags.  Just line the other side with another piece of paper to write on and use a hole punch to make somewhere to secure with ribbon.

IMG_6089

This slideshow requires JavaScript.

Christmas Cards, Kids Craft

Standard
Christmas Cards, Kids Craft

IMG_6081I couldn’t get my hand on any decent glitter paint pens to finish these, so this is just part one of the process.

 To make these decorated cards, all you need is a hot glue gun, strips of wrapping paper, card and either some large buttons or as we used, some plastic jewels.

IMG_0668

Cut strips of Christmas paper, approximately 3 – 4 cm wide and 30 – 40cm long.   Fold back and forth to create a zig zag, approximately 1cm wide.  As demonstrated by Mr 7 below.

IMG_0669

Once folded the whole way to the end, glue both ends together.  You can get the kids to do this with craft glue, but I chose to use the glue gun as it dries so much quicker.

IMG_0671

Once the glue has dried, put a circle of hot glue onto the card where you want to place your decoration

IMG_0674

Carefully turn the paper in at one side and out on the other, to create a flower type shape.  Trying not to let it all go at the same time as you can see on the right above.  The first one is the hardest!

IMG_0683

Then cover the back of your jewel of button with hot glue and place in the centre.   Repeat until you have as many decorations on each card as you like.  You can experiment with different thicknesses of paper to create bigger and smaller ones.

IMG_0695

Teacher Christmas Gift ideas – part 2.

Standard
Teacher Christmas Gift ideas – part 2.

This year, with changing schools and doing my Ed support certificate, I spent a fair bit of time hassling the ladies in the school office.  They are all very lovely and didn’t mind, but I really wanted to say thank-you.  Also, there is the little 2’s day care providers.  They only go one day a week, but they are great staff, so I figure they deserve some token of our appreciation.  I originally thought of making some sweets and wrapping them up to share around the office/centre, but after Mr7’s teacher claiming the doesn’t eat chocolate, I am damaged.  So I decided to find something small, that you don’t feel obliged  to keep, but you can use and most people like – a votive seemed just perfect.   I shopped around all the cheap shops hoping to find something that was affordable without looking cheap and nasty, then went to Dusk and found 6 packs of Christmas themed votives for $16.95.  Which was about what I had budgeted for.


IMG_6062


I grabbed a packet of Ferrero chocolates to top them off.   Then just stocked up with some Christmas ribbons and gift tags.  Not really sure what was going to work. After some trial and error, this was the finished product.


IMG_6077


This slideshow requires JavaScript.


Quick Kids Craft – Christmas Themed

Standard
Quick Kids Craft – Christmas Themed

Mr 7 actually came up with this by himself.  He was not home when we did the leaf pictures, but he used that idea for inspiration.

Some craft glue, a marker, coloured paper, leaves and flowers and a brush.

Some craft glue, a marker, coloured paper, leaves and flowers and a brush.

I drew the basic outline for him, while he and Ms 3 collected some fine leaves and flowers from the garden.

Spread the paint into the area you want to cover.

Spread the paint into the area you want to cover.

Then he painted the glue on.

and start sticking

and start sticking


The finished product.

The finished product.


Too easy!  Next time we might frame them.  Or cut out the shape and put it on some different coloured backing.

This slideshow requires JavaScript.

Not your every day tree – Christmas Craft

Standard
Not your every day tree – Christmas Craft

This idea actually came from a Woolworths Fresh Magazine idea, but I have also seen similar things on Pinterest and other blogs.   I went slightly over the top compared to theirs – so unlike me.

We went for a walk around the local park lands and collected some sticks that I thought would be good for the job.

The branches

The branches

Then I gave them a light spray of white paint.

Spray painting the branches

Spray painting the branches

Left in the sun to dry for a few hours, which resulted in this

The painted branches

The painted branches

The original idea I was looking at used a rusty bucket for the pot, but as I don’t have one of those laying around, I had to come up with something else.  I found an empty plastic pot and decided we could work with that.

Covering the plastic pot with aluminium foil

Covering the plastic pot with aluminium foil

I covered it in a layer of aluminium foil, before a layer of transparent cellophane just to give it a bit more shine.

Then a layer of cellophane to go with your colour theme

Then a layer of cellophane to go with your colour theme

Once we were happy with the finish of that, we collected some rocks from the garden to fill the pot and hold the branches into position.

Filled the pot with rocks to secure the branches and to stop it tipping over.

Filled the pot with rocks to secure the branches and to stop it tipping over.

Then it was time to decorate!

Decorating the tree

Decorating the tree

Outside, to try to catch the sparkle

Outside, to try to catch the sparkle

With LEDs around the base

With LEDs around the base

I am really struggling to get a good photo of this thing, just like the bauble tree, because the camera takes away all the sparkle.  It really stands out in real life. I might have to read my camera manual.

This slideshow requires JavaScript.

Christmas Gift idea – Teachers gifts.

Standard
Christmas Gift idea – Teachers gifts.

As it turns out, on of my sons teachers does not drink alcohol, so my fall back gift of a nice bottle of wine or spirits at the end of the year was ruined.   Buying an actual gift for someone you know very little about, have never seen inside of their house to understand their taste, I find really really hard.   I stumbled across these nifty little things at House

I grabbed 3 different colours as my eldest son has 2 teachers.  Woolworths just happened to have Cadbury Favourites  and Lindt Lindors half price!  So I stocked up on those and away we went.


We filled them almost to the top with chocolates, then wrapped in cellophane


finished off with some ribbon and a bauble.

Then my son comes home and informs me that she doesn’t eat chocolate either…   So we are back to square one for her!

Christmas Craft – DIY Bauble Tree

Standard
Christmas Craft – DIY Bauble Tree

I had been wanting to make one of these for years.  And this year, we did!   I purchased a large piece of card from the newsagent for $1.50 and cut out a half circle (i just used a piece of string to make a giants protractor).   Secured with some tape and we are ready to roll

The little ones had the job of pulling off the strings and clamps, Mr 2 thought that way great fun.

I knew that hot glue gun would come in handy one day.  This is the day.  Mr 7 demonstrates.

Start at the bottom and work your way up.  We did red purple alternations with every 5th ball gold.  Trying not to put the same texture finish beside each other, but it becomes difficult to avoid

This is the back side where things don’t quite meet up.  If I was to make another one, I would be more conscious of the size and make sure it fits the balls around perfectly – however, all is not lost as you can see next.

Once all the balls are stuck down start inserting the tinsel between the cracks.   I actually ended up using 10 meters (30ft) of this thin tinsel.  I didn’t imagine it would require that much.  The tinsel hides any ‘mistakes’ very nicely.

And there you have it.  It really needs a bigger star, but over all I am happy with the results.

You can buy similar things pre made at Kmart for $12, but where is the fun in that?  All up the project cost around $16.

This slideshow requires JavaScript.