Tag Archives: fine motor

A family that bees together, stays together.

Standard
A family that bees together, stays together.

Or something like that. 🤷🏽‍♀️

I have been wanting a beehive pretty much forever. Now that we live on a bit more land with a lot more flowers and fruit trees, even more so. But when do you have a spare $400 or so to splash out on a box full of insects? So, alas, it has been sitting on the Wishlist for some time. In a strange turn of events, a swarm of bees made house at Mr SAHL’s work this spring. A kindly man came and removed the swarm and a friendship was established. To cut a long story short, said bees will ‘bee’ coming to live with us in just a few weeks!

But with bees comes responsibeelity! I swear I’ll stop with the bee puns never. In preparation for our new little garden helpers, today we started to build their home expansion (they’ll be coming in a hive).

To save a few dollars, we purchased everything in kit form. It was ridiculously easy to assemble as Miss 9 and Mr 8 demonstrated.

The kids loved assembling the frames and inserting the eyelets with a hammer. The hand-eye coordination and fine motor exercises won’t harm them either ;). Tensioning the wires was left to the adults, but all in all, it was very simple.

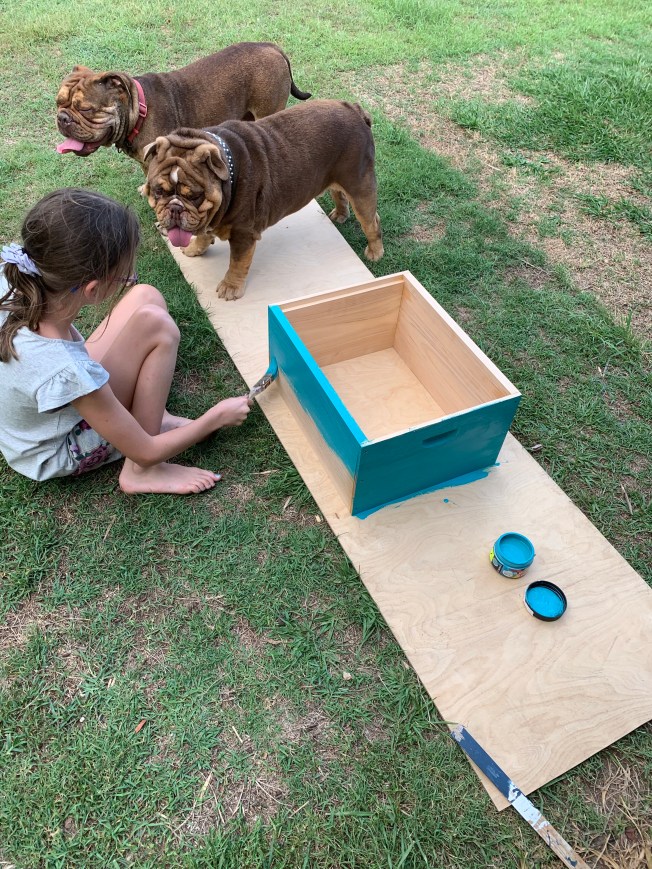
They all wanted to help with painting the box, even the doggies, which my OCD struggled with, but hopefully, I can fix that on the final coat.

Overall it was a productive afternoon. It was so nice to not even have to ask the kids to help, they were actually interested and motivated. Let’s hope this motivation keeps up once the actual bees arrive! wiring the framesframe with foundation

Simple Christmas Card Ideas, Part 1.

Standard
Simple Christmas Card Ideas, Part 1.

Here’s a simple card decoration idea that doubles up as a fine motor activity.

For all the card projects this year I am using plain black card stock.  They were $2 for a pack of 12 at a $2 shop.

For this project you will need some coloured paper or thin cardboard, craft glue and any decorations you like (we kept it simple with an angel sequin)

Trace out a tree shape on the back of one of the pieces of paper.

IMG_7222

Fold the other coloured paper in half to double it over then bring all 3 pieces together and cut along the outline so you end up with 3 identical shapes.

IMG_7223

Using a pencil draw some lines across the back of one of the trees.  Then tear carefully along the lines as demonstrated by Ms5

IMG_7225

Cover the other colour tree completely with glue, then stick down every second piece of torn paper.

IMG_7228

Allow to dry and secure to your card stock 🙂

Torn paper christmas tree.

Torn paper christmas tree.

Make Your Own Bottle Top Stamps

Standard

Here’s a super quick and easy activity to put together to keep your toddlers and preschoolers entertained.  All you need is some bottle caps and foam stickers (available from most $2 shops and craft stores). If you don’t have a stamp pad, you can spread out a thin layer of paint on a plate or add a few drops of water to a water colour tray like we have.  

bottletopstampPreview


This slideshow requires JavaScript.

Soup Mix Scale Creatures, Sensory Craft

Standard
Soup Mix Scale Creatures, Sensory Craft

I actually stole this idea from Mr3s current favourite show, Mister Maker.  We used soup mix, but you could use lots of different things, dry lentils, rice, couscous, anything that is going to give you a unique texture and that is fun to run through your hands.

IMG_4624

I just printed out some basic shapes from the internet.  Keep them simple as you’re going to cover up any detail anyway.  Smear the area with some craft glue and attach an goggly eye. Then let the kids sprinkle the mix over the rest of the glue area to completely cover it.  Gently shake off any excess into the bin.  These took about 24 hours to dry.  Once fully dry, cut out.  We created a simple background with some coloured paper and put them in $2 Ikea frames.


soupmix2

Easy Sun Catcher, Kids Craft

Standard
Easy Sun Catcher, Kids Craft

Everyone loves a sun catcher – well according to Pinterest they do! This is basically the same concept as the Valentine Hearts  we did a few weeks back, but instead of random shapes, we used a punch to make stars and circles etc from the cellophane. Once laminated, we cut out smaller shapes and hung them from a branch with some beads.

suncatch

This is yet another almost impossible thing to photograph, it looks so much more bright and colourful in real life. I don’t know why I keep doing this to myself, or maybe I just need to do a photography coarse, or even read the instructions for my DSLR…

Toddler Craft, Bottle Cap Beetles

Standard
Toddler Craft, Bottle Cap Beetles

Here’s a cute fine motor activity for the little ones using recycled objects from around the home. Made by All Tizzied Up over the school holidays.

OLYMPUS DIGITAL CAMERA


Hover over or click on the images below for more details.


OLYMPUS DIGITAL CAMERA

Easy Kids Craft – Hanging Christmas Decoration

Standard

These are really simple to make and kids of all ages can help.  Mr8 actually showed me how to make one, then we extended on the concept to create this hanging ornament.

3dstars

It is really just 2 card board stars slotted into each other at right angles to create a ‘3D star’ as he calls them.  But we made 4 different sized and hung them form some cotton.  We covered each star with some paper from a themed wrapping pack, so they were not all exactly the same, but similar enough to ‘match’.  The whole project took about 20 minutes for 3 of us and looks pretty cool!  Further instructions available if you open or scroll over each picture.

DIY Marble Effect Baubles, Family Christmas Craft

Standard
DIY Marble Effect Baubles, Family Christmas Craft

Everyone was making all sorts of cool glass baubles last Christmas, but by the time I tried to source the actual baubles to do anything with, they were sold our or $6 each – errr, nah.  But I found some in Spotlight in August this year and grabbed them so I didn’t miss out again!

Baubles1


I got the 2 different sizes available at spotlight, but for this project we just used the smaller ones.   The process really is so simple it barely requires explanation.  The beads are just plastic pony beads, you can find them in either the craft section or the ‘girls’ toy section of most variety stores.  The ones that turned out the best were about 2/3 transparent beads and 1/3 solid colours.  We did one with just transparent beads, but it ended up all kind of mixing together and turning brown, which was disappointing.  If you don’t have a well ventilated kitchen, it would be a good idea to do these outside on the bbq, but the beads surprisingly don’t let off much fumes compared to other melting plastics I have played with.   I had the oven set to just over 220c.  You will need to keep checking on them every 5 – 10 minutes and turning as desired to create the marble effect.  We used a silicone muffin and chocolate tray to position them after each turn and plastic tongs to handle them with.  I ended up adding some extra beads to a few half way through the process, and just used a tea towel to hold them while they were hot.

As they cooled down out of the oven, they did make a popping sound, which I thought was the glass breaking – but it was just the plastic separating from the glass inside a few of them.  There you have it, marbled Christmas baubles.

School Holiday Fun – Rainbow Spaghetti!

Standard
School Holiday Fun – Rainbow Spaghetti!

I actually made this for the little 2, thinking it would keep them entertained for an hour while I got some work done.  Turns out the older kids loved it too. Can’t really blame them, it feels cool and looks so pretty!  I just used one standard pack of pasta, if you were doing this at a birthday party, you might want to use 2 or 3 for lots of kids.  Separate into equal groups of as many colours as you have, then cook each pile at a time, rinsing the saucepan between colours.  You don’t need a lot of water, so it heats up quick.  The whole process only took about 30 minutes for 5 colours.  More details if you run your mouse over the images.  Enjoy.

RS

Ten Tin Bowling! Recycled Cans – Toddler Activity.

Standard
Ten Tin Bowling! Recycled Cans – Toddler Activity.


The hardest part of this project was collecting the cans!  To make stacking easier, make sure all 10 cans are the same height.  Obviously you don’t need to cover the cans with paper, but I think it made it a bit more fun.   I just cut some scrap booking paper to size, fixed with tape, and they’re done.


This activity develops hand eye coordination, cognitive and gross motor skills.  Once you’ve had enough, the cans can just go into the recycling!   The kids loved the noise they make as they smashed to the ground.  Older kids could keep score and make a more competitive game out of it.


tentinbowling

DIY Sun catcher/Wind chime.

Standard
DIY Sun catcher/Wind chime.

This project was inspired by another bloggers post, which I can’t find again on Pinterest, so will have to edit it back in later when I can find it.  Anyway, I ended up doing something completely different to hers, because I couldn’t get my hands on the right kind of cups.  The original mobile was created with plastic (recycling number 6) disposable drinking cups.  I hunted high and low however, the only ones of them here were solid colours, so I had to settle for these shot glasses.  The shot glasses are a lot thicker though, so the entire method required adjusting.  As you can see in the gallery images, melting these at a low heat basically make little plastic globs that would only be good for playing jacks with.   Eventually I worked out that by turning the heat up enough, I could get them to melt flat.  However, they did emit a nasty smell at this temp, so I took the project out to the BBQ.  

Adding the next colour

Adding the next colour

After melting the first cups, I added another cup, so there was enough plastic to cover the base of each muffin hole.  I was not too worried about thickness, some ended up with 3 cups, I broke a few cups up to splash some other colour around.  The BBQ was set to 220C with the lid down.   After cooling, this is what you get; 

The finished disks

The finished disks


They actually set really hard and when clicked together sound like glass rather than plastic.  Makes them perfect for a wind chime.  Just like with my previous sun catcher, I drilled holes in the sides of each piece using a normal drill bit.  None of them broke this time, which was an extra win.  Then we threaded some fishing line through, held each end together and threaded random shiny and transparent beads along the 2 lines. Admittedly I do have a ridiculously huge stash of beads and stones accumulated from over the years, but you can pick up cheap beads at $2 shops that will still make the project inexpensive if you were starting from scratch.  The first line was 11cm, then I continued along making each one 1cm longer, there is 17 in total.  My darling partner tied them on to the pre made metal loop (from spotlight – and much to his disappointment, he is not a crafty person).  Once they were all tied on, I just slid them around until they were spaced evenly.  And done! 

Close up

Close up


** Please note, breathing in the fumes from melting plastic is probably not a very good idea.  So if you do try this at home, try to use the BBQ or make sure the room is well ventilated, and preferably don’t be near the oven while its all happening.  It not like burning tyres or anything, but it sure doesn’t smell like something you should be breathing in! 


Home Made Chalk with an Easter Twist.

Standard
Home Made Chalk with an Easter Twist.

I have been going to try out this home made chalk method for a while.  When I picked up some new silicone moulds from Aldi last week, I figured it was the perfect opportunity to try them both out!

Ingredients and utensils.

Ingredients and utensils.

Ideally disposable plastic cups would be the best thing to mix the plaster in, but I didn’t have any, so we just used some plastic cups we are not very attached to (IE, not Tupperware, lol).  You can buy plaster of paris from any large hardware or craft shop for around $10 for a 3kg (which is heeeaaaaps, 1kg is more than enough for this project). Silicone or rubber ice cube trays, food colouring and something to stir with.  Again, paddle pop sticks would have been better, but these skewers will do the trick.


Mix the food colouring in the water first, then add the plaster.  Stir rapidly until its fully mixed, then poor into the moulds. The plaster will set in roughly half an hour, some water may rise to the top, you can just dab this away with some paper towel or tip the moulds after this time for it to run away.  Then allow to fully cure in the moulds over night.  We also experimented with some glitter in the chalk, for something a bit different.  It actually worked quite well, although its really hard to capture the results with the camera.


Then simply turn out of the moulds and get drawing!

IMG_6633


This slideshow requires JavaScript.


Easter Craft, Cute Little Chicks.

Standard
Easter Craft, Cute Little Chicks.

Another very wet weekend has resulted in craft overload in this house.  Today we made some little chickens.  We will call them Easter Chicks, but they could really just be birds and would still be just as cute!  All we used was some small styrofoam balls, paint, google eyes a pack of feathers and a few different glues and double sided tape.  Oh, and some of those pre stuck felt shapes.  First we put the balls on a skewer to hold them up to paint.  The paint, like everything at the moment, took forever to dry, even under the ceiling fan.  Then we added the eyes and beaks.  It was a bit of trial and error with the glue, as some glue dissolves the styrofoam.  But we got there eventually, with some scrap booking glue.

Glue on eyes.

Glue on eyes.


For the beak, we just cut off petals from a foam flower sticker (which you will see further on).  We used several different methods to make the wings.  For thicker wings I folded over a feather from the centre, and secured both sides together with some double sided tape.  This worked well, but was a lot of fiddling around and you could see the tape through some, which I was not happy with.  Others I just cut away one side of the feather, to make it more a wing shape.  Then for the crazy birds I just stick the feathers straight in the side, to make them look like they were running.  Way cute!  Twisted some pipe cleaners to make legs and we were done.

IMG_6565


Ms 4 wanted to make a nest for them, so I grabbed some sugar cane mulch and let her build one outside, she then sprinkled a few flowers around which I thought was a great idea, so told her to get more.

IMG_6595


The coloured eggs are from another project we did this weekend, I will post more on them tomorrow.  They finished it off nicely though I think.


Bubble Painting Easter Garland, Toddler Craft Activity

Standard
Bubble Painting Easter Garland, Toddler Craft Activity

Bubble painting is nothing new for toddlers and preschoolers, but we have never done it at home and I thought it would create a cute finish for some paper eggs.

IMG_1373

Most people will have all this stuff lying around the house, so its a cheap activity too.  Dish washing liquid, food colouring, drinking straws, paper (in this case egg shapes) a bowl and a splash of water. I just Google Image searched ‘easter eggs’ and found some egg shapes, copied into Word, adjusted the size and printed.  Could have drawn them myself, but I was being lazy.  The bigger 2 kids helped cut some out and I cut out the rest. The mixture is equal parts water, food colouring and detergent, you can use more water, but the less you use the more vibrant colours are achieved. Then the fun begins!

Yellow bubbles.

Yellow bubbles.

Simply blow the bubbles so they rise well above the sides of the bowl then place the paper flat on top.  You may need to tip your bowl slightly to keep the straw submerged.  Be sure to place the paper as quickly as possible.  The bubbles will actually last quite a while if untouched, but the colour drops to the bottom quickly, so the longer you wait the less colour will transfer to the paper.

Samples of our creations.

Samples of our creations.

Once dried (on a dry day they would only take a few minutes to dry, but due to never ending rain in Sunny Queensland, they took a lot longer) we attempted to punch holes in the top to string them up with, but due to the moisture in the air, the paper just can’t get crisp enough to punch as such, so we stuck small sections of straw to the back with sticky tape.  This actually worked out really well, as it meant they face forwards rather than side ways all the time.  We used some more coloured straws (cut into 3rds) to space the eggs out then alternated sizes along the way.

IMG_6510

And there you have it.  Its hard to take a photo of, but its really pretty.  Currently hanging in the hallway.  If the sun ever comes out again, I will take a photo of it in natural light to bring out the colours better.


Valentine Heart Activities for the Kids, with a side of FAIL!

Standard
Valentine Heart Activities for the Kids, with a side of FAIL!

The concept here is very simple, so the results are totally worth it. Gather up any old crayons, or you could even buy new ones if you like, but with 4 kids in the house, we have plenty of old odd sets.  Let the kids remove the paper (strengthening fine motor skills for the win!) and snap or cut into small enough pieces to fit in your desired mould.  *make sure your mould is heat proof!

IMG_1115Heat the oven to around 120c, it really doesn’t need to be very hot. Place in the oven on another hard tray (like a pizza tray) because they will be super runny before they set again and you don’t want crayon spilt inside your oven – ask me how I know?   If you do happen to spill a few drops, wipe it off with paper towel straight away, much easier to remove it while its still runny.

Once they are all fully melted, remove from the oven to cool.  I put them in the fridge after a while, because I am impatient.  Then just press them out of the moulds and you’re done.

IMG_1147

And now for the fail.  Originally I wanted to make crayon rings, for something a bit different on valentines day.  So along with my heart tray, I ordered a ring tray.  We were all set to go and excitedly looking forward to the results.

IMG_1076

But alas, this tray must have been for the freezer only.  I was sitting at my desk and thought ‘what is that smell’ walked to the oven to check and holey smokes!  I opened the door quickly, at which point the lot burst into flames!  So I threw some water on it in my panicked state.  The results?

IMG_1079A house full of toxic smoke and a colourful mess to clean up!  Oh dear.  So please, learn from my mistake, make sure you check the temperature ratings!

Wind Chime / Sun Catcher

Standard
Wind Chime / Sun Catcher

Continuing on from the Christmas decorations we made a few weeks back, using the same principal we put together this wind chime or out door decoration.  I’ll spare too much description, as its all talked about in the previous post (linked above), and its pretty straight forward anyway.

So this time we just made all stars, the kids chose their colour schemes and I wasn’t too worried about a colour theme as such.  More colour the better.  Once cooled, again we drilled small holes into a corner of each one, then threaded some fishing line to hang from a branch.  I used a tiny dot of hot glue to keep the fishing line in position.  And that’s it!  Easy peasy.

This is about the 4th time we have made sun catcher type things, and every.single.time there is no sun when I go to take photos of it.  I will hopefully update this when the some decides to come out again.

Valentine Craft – Hanging hearts Wall/door Decoration

Standard
Valentine Craft – Hanging hearts Wall/door Decoration

I saw something similar to this on Pinterest, thought we would give it a go.  I just used some scrap booking paper we had already, picked out 10 different pink patterns.  Using the paper cutter, cut strips approximately 1 inch wide.  Then folded them in half, ready to be rolled, as demonstrated by Ms 4 below.  The kids did them around a round pencil, but you can also curl them with a blade like you do curling/gift ribbon.  The blade was much quicker, but I was not letting the kids do that.

IMG_6364

Once both sides are curled towards the middle, fix the to sides together in the centre of the heart with a staple.  I didn’t worry to much about a uniform size.  Variety is the spice of life and all that.

You could use a coat hanger, pice of dowel, or even just a long stick for the hanging frame.  We used some mettle light extension rods we had in the shed, kept them thinking they would come in handy some day and looky here, perfect size for a door way!   I decided on 5 strings of 10 hearts, because lets be honest, the novelty was already wearing off making them after the first 10.

IMG_6382

Then came the tricky part, threading them onto the fishing line.  I temporarily hung the rod from a fan so I could manoeuvre around it easier.  Then threaded through the centre of the heart and tied a knot around where it is stapled together, so the line was centre.  THEN, using a needle, threaded the remaining line through the centre at the bottom of the heart, to keep the heart upright.  Thankfully putting fishing line through a needle is very easy!  The threading process probably took 10 minutes for each strand.  To finish off, I hung some sparkly gift ribbon between each row.  And there you have it!

IMG_6388

IMG_6396

This slideshow requires JavaScript.

Beaded Mobile/Chandelier/Wind chime Family project.

Standard
Beaded Mobile/Chandelier/Wind chime Family project.

Sorry if the beads are getting old.  I really made this up as I went along. I wanted to use the rings I had bought to make Christmas Wreaths but never got around to.   I thought this was something we could all do together and the results are pretty cute, although would do it differently next time.


Ending the wire


We threaded some plastic jewels with beading wire, to make the ends. Then created patterns with different coloured beads, around 20cm long.

ends ready for string


Finish off the ends by wrapping the wire into a loop around some needle nose pliers.  The loop needs to be big enough to not let the beads slide off, and to allow you to thread more string on in the next step.

Then I just tied them around the ring, suspended it with some gift ribbon and suspended a glass sun catcher in the middle.  All pretty straight forward. Ms 4 wants to hang it from her light, but as she has a light fan combo, there is nothing to hang it from.


IMG_0991


This slideshow requires JavaScript.


Christmas Decorations, Easy Toddler Activity

Standard
Christmas Decorations, Easy Toddler Activity

These really are too easy and turned out so well!  I will be using this concept for some other projects as soon as more cookie cutters arrive.

IMG_0903

We used a tupperware baking sheet under them, but I think any flexible non stick surface would do, (baking paper).  Simply fill some metal or oven proof cookie cutters or moulds roughly 2 layers deep, and bake at around 180c.  Keep an eye on them until they are all melted.  The plastic beads we used did not emit any nasty smell and did not burn, even when I got impatient and turned the over up to 200c, however, make sure the area is well ventilated just to be on the safe side.

IMG_0905

Try to pile the beads up in the middle slightly, but only leave them 1 high at the edges, to avoid any bits sticking to the sides higher than other areas (you can see where this happened on the small man) Once cooled, remove the cutter and there you have it.  I ran cool water over them to cool them a bit faster and this didn’t damage the shiny finish at all.

The husband drilled some holes in the top for string, and there you have it.

IMG_0910

We will make a stack of smaller Christmas coloured ones for the trees next year.

This slideshow requires JavaScript.

Glitter Play Dough (Home made)

Standard
Glitter Play Dough (Home made)

After establishing my daughter has low muscle tone, it was suggested by her occupational therapist that we use play dough to warm up her hands before any writing or drawing activities.   Obviously it also has many other benefits, like fine motor, creativity, blah blah, but anyway.  After buying all the different brands and them still ending up dry and ‘ordinary’ after a week, I decided it was time I got off my little b-hind and made our own.  Unfortunately I only had blue food colouring on hand (because the kids always want some in the bath, so we go through a lot :s ) .    I chose this recipe, as it had a 5 star rating.  The only problem is I don’t have nor have ever bought cream of tartar?  So some googling suggested I could omit it for baking powder and vinegar, but the vinegar was going to mess with the liquid content and ohhh, it all seemed too hard.  So, as I do, I figured I’d just do a splash of this and a bit of that.  I used about 1 tablespoon of white vinegar and 2 tablespoons of baking soda.

Ingredients

What you need

I mixed all the dry ingredients with a whisk, then added the water and the rest of the wet ingredients.  It was very wet.

Wet ingredients

All mixed together.

The recipe does not actually tell you how hot to cook it, so I just went with 4, which is just below half way on my cooktop.  This worked well.

Thickening

After just a few minutes it starts to thicken.

I continued working with the whisk to avoid lumps, but eventually it became too thick and was all getting stuck in the middle of the whisk.

Looking just about ready.

I’d call that done.

Soon enough, this is what we had.  I used my fingers to test (first time they came away all sticky, much like a skewer in cake) but then it was just about right.  Surprisingly even though it was still over the heat, it was not very hot to touch.

Adding glitter.

Adding glitter to the cooked dough

I added a vile of glitter, because – well why not?  I did this before the final kneading so it was well distributed.

And there you have it

And there you have it.

And here it is.  The recipe says it makes enough for 4, but I’d say its more for 2.

Playing

Playing

It turned out really smooth and soft.  As demonstrated by Mr Grubby.

Ready to store

Ready for the fridge

The recipe suggests it keeps for up to 6 months in the fridge.  I like the sound of that, I’ll be happy if it lasts 2 weeks.

Creations

playdough creations

Aliens

The Aliens have landed

The recipe;

1/2 cup of salt

1 cup of plain flour (I used SR)

2 Tablespoons of Cream of Tartar (I used 1 tablespoon of white vinegar and roughly 2 tablespoons of baking soda instead)

1 cup of water

1 tablespoon of oil (I used olive oil)

Food colouring (I used a generous splash, probably 2 cap fulls)