Tag Archives: craft

Rustic Clay Wind Chime

Standard
Rustic Clay Wind Chime

It has been entirely too long between entries.  Life gets like that though I guess. I actually made this wind chime back in May, but have not had a chance to blog about it. Pretty sad when you can’t find a spare half hour in 7 months… but hopefully I will make up for that over the next 3 weeks while my schedule is not so hectic.

I am really happy with the way this project turned out, but it may not be something everyone can make at home, as you will need access to a kiln for the baking of the clay.  I am lucky enough to have that access 🙂  The discs were made from potters clay, available from any good craft shop, about $30 for 10kg (it’s really heavy when wet!). I rolled some clay out to around 5mm thick, then cut the circles out using a metal egg ring.  I then used a variety of leaves and flowers from around the garden, laid them over the clay and rolled over gently with a rolling pin, just enough to create the patterns as you can see.

Clay craft

Clay circles with leaf and flower prints.

Once baked and cooled, it was time for assembly.  Mr 5 and Miss 6 were happy to help decorate the pieces of fishing line with some chunky transparent glass beads I had in my bead stash.

Threading beads

Threading the beads on fishing line before assembly

We then went on a hunt for the perfect stick, attached it to a chair and began assembly.  I wanted the discs to taper down, so this was not something the kids could help with.
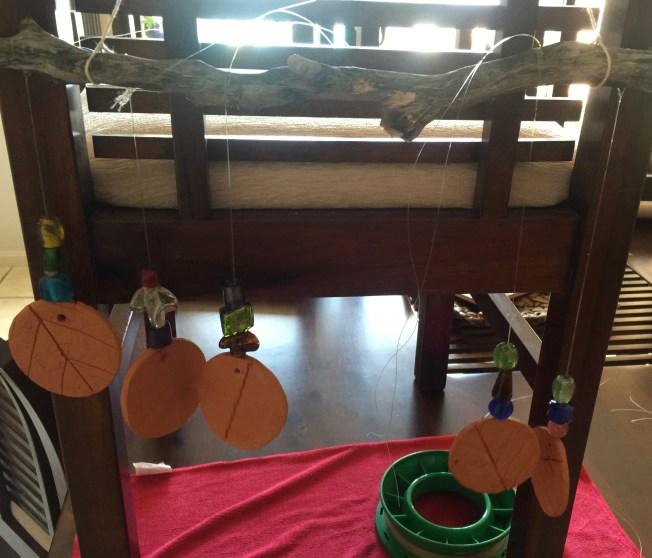
Assembly of wind chime

Assembling

Once I was happy with the positioning of each string, I tied them in a few more knots and decorated the top hanging twine.  Cut off any loose ends and it’s done.  As simple as that.

IMG_8881

Each disc touches the next ever so slightly, making a lovely sound in the breeze, without being too noisy.

IMG_8873


Simple Christmas Card Ideas – Part 2

Standard
Simple Christmas Card Ideas – Part 2

Christmas craft that doubles up as a math lesson! Hehe.

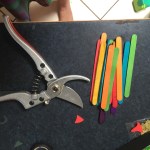
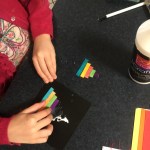
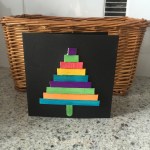
This activity really doesn’t require much explanation.  All you need is some paddle pop sticks, sharp scissors or secateurs, some craft glue and card stock. Work out how tall you want your tree.  If you want to make a pattern, decide on that now too. We just went random.  Measure out on the sticks 1cm, then 2cm on the next one, 3cm and so on.  Cut the sticks where you have marked them.  Set them out on the table then add a generous amount of glue to your card, stick them down and you’re done!

We added a little green tree trunk to ours too, but that is optional.  You could also add some other little squares of stick as decorations if you wanted.

Paddle pop Christmas Tree.

Paddle pop Christmas Tree.

Christmas Craft For Kids – Cup Cake Christmas Trees.

Standard
Christmas Craft For Kids – Cup Cake Christmas Trees.

These are so easy to make and turned out super cute.  Inspiration actually came form some fish scales I saw some students at school making.

IMG_7101

All you need is some cup cake papers, cardboard (we used an old cereal box) glue stick (or paper glue) and scissors.  We just used cup cake papers we had in the cupboard, the striped green is my favourite.

Draw and cut out a tree shape.  For the first few, I drew lines as a guide for the rows so that Ms 5 didn’t just stick the papers all over the place.  This created the layers or ‘tiers’.  By the time she got to do her own at the end, she didn’t need lines anymore as she understood the process.

IMG_7068

Just press down the flat part (the bottom) of the cup cake paper, not the corrugated part. Once the bottom line is covered, move up to the next row and repeat until you get to the top.

IMG_7070

Ms5 decided to finish them off with a yellow paper sticking out the top like a star.  Great idea!

Cupcake Tree

Cupcake Tree

treee

The Craft Cupboard Overhaul

Standard
The Craft Cupboard Overhaul

I’ll be honest, I rarely walk past a discount shop without picking up a little something for my craft stash.  The only problem with this, is finding somewhere to keep it all.  The side board I keep everything in was at breaking point, it had been for weeks actually. So it was time to dive in and sort everything out.  It was a painful 3 hour job, but worth it!


This slideshow requires JavaScript.


4 small bins worth of rubbish and a few hours later…


That all fits nicely now, but it did mean my supplies have to start taking over another room.

Craft cupboard.

Sewing kit, ribbon box, wool and twine box, tule, felt and glue stash.

Ohhh, looky, there is even some extra space!  What ever will I fill it with?  Mwahahaha!

Easter Biscuits – Kids in the Kitchen.

Standard
Easter Biscuits – Kids in the Kitchen.

Much to my children’s disappointment, I am not much of a sweet tooth.  So I struggle to be inspired to make sweet treats.  But I figured we should do some ‘cooking’ for Easter, and this seemed simple enough for my likings.  🙂

They kids had lots of fun making mess with the icing and creating patterns on the Arrowroot biscuits.   I just bought ready made icing – because yes, I am that lazy.  🙂  Mini M&Ms and snakes for the stripes.
 

Easterbisuits2.jpg

Kids Craft, Easter Egg Sun Catcher / Stained Glass

Standard
Kids Craft, Easter Egg Sun Catcher / Stained Glass

Inspiration for this project came from Alpha Moms blog. I thought I’d adjust it into an Easter themed project, given it is already that time of year.

All you need is some of the whitish milk or juice cartons.  We actually used a cordial bottle for the grass.  The stickers on the milk bottle where quite hard to remove and left a sticky residue.  I managed to remove this with some mineral turpentine.

Once you have your clean pieces of plastic, draw or as we did, trace your shapes using a black permanent marker (Sharpie etc).  Then let the kids colour as desired.  Once coloured, cut away the extra plastic and you’re done!  They turned out even better than expected.

20140406-170035.jpg


We attached ours to the windows using double sided tape rather than suction cups.


Pom Pom Easter Wreath

Standard
Pom Pom Easter Wreath

The girls at All Tizzies Up do love a pom pom or 700!  Here is a simple easter wreath they put together using basic craft materials and a pile of pom poms!


OLYMPUS DIGITAL CAMERA

Make Your Own Easter Head Bands

Standard

The girls at All Tizzied Up had a busy weekend doing Easter craft. Their first creations were these cute little hand made head bands.

Mum has taken step by step photos that do all the explaining themselves.

Preview


OLYMPUS DIGITAL CAMERA

Make Your Own Bottle Top Stamps

Standard

Here’s a super quick and easy activity to put together to keep your toddlers and preschoolers entertained.  All you need is some bottle caps and foam stickers (available from most $2 shops and craft stores). If you don’t have a stamp pad, you can spread out a thin layer of paint on a plate or add a few drops of water to a water colour tray like we have.  

bottletopstampPreview


This slideshow requires JavaScript.

Cardboard Roll Easter Chicks – Kids Easter Craft.

Standard
Cardboard Roll Easter Chicks – Kids Easter Craft.

I’d like to say I came up with this all on my own, but that would be a lie.  Ms5 and I made some owls inspired by this post from   Kerrys Craft Blog.  It was from this concept that I came up with these easter Chicks.  I thought the fact you can hold eggs or treats in them was ideal for an easter craft project.

IMG_4814


All you need is some coloured paper, cardboard rolls, tape and glue.  You can make them just as cute without the feathers, goggly eyes and pipe cleaners, but if you have some of those handy, you could use them like we did too.   The main difference between these and the owls is that the top and bottom folds are in opposite directions to each other, so the head comes to a peak in the middle rather than making two ears like the owls have.  The rest of the instructions can be found by running your curser over or clicking on the photos below.


easterchicks

Bugs and Bees and Butterflies! So Sweet!

Standard
Bugs and Bees and Butterflies! So Sweet!

Check out these cute bugs the girls at All Tizzied Up put together on the weekend.  Made from pipe cleaners, pom poms, wooden pegs, goggly eyes and tulle.  So simple and so cute!

OLYMPUS DIGITAL CAMERA


They have kindly taken step by step photos so you can be inspired too, to create your own colouring creepy crawlies.

OLYMPUS DIGITAL CAMERA

Soup Mix Scale Creatures, Sensory Craft

Standard
Soup Mix Scale Creatures, Sensory Craft

I actually stole this idea from Mr3s current favourite show, Mister Maker.  We used soup mix, but you could use lots of different things, dry lentils, rice, couscous, anything that is going to give you a unique texture and that is fun to run through your hands.

IMG_4624

I just printed out some basic shapes from the internet.  Keep them simple as you’re going to cover up any detail anyway.  Smear the area with some craft glue and attach an goggly eye. Then let the kids sprinkle the mix over the rest of the glue area to completely cover it.  Gently shake off any excess into the bin.  These took about 24 hours to dry.  Once fully dry, cut out.  We created a simple background with some coloured paper and put them in $2 Ikea frames.


soupmix2

Kids Valentine Craft – Stained Glass Hearts

Standard
Kids Valentine Craft – Stained Glass Hearts

I was determine to do some Valentine craft today with the kids before we ran out of time.  I had an idea in my head of what I wanted to do, but we couldn’t find the type of paper I needed.  While picking up some other bits and pieces from the grocery store, we found A4 laminate sheets on special and decided to grab some for the craft cupboard. I had a look around Pinterest for inspiration and then it finally came to me, lucky we grabbed those sheets!
IMG_4565

The steps are pretty self explanatory I think, but you can see more instructions by clicking on or running your mouse over each photo below.

The similar projects I have seen on Pinterest use clear book contact, which you could also use if you don’t have a laminating machine.  The laminate sleeves give a much clearer finish though.  I was worried at first that the cellophane might melt as it went through the heat, but it was fine.

glasshearts

Ribbon Roses, Valentine Craft

Standard
Ribbon Roses, Valentine Craft

All Tizzied Up has taught her daughters how to make these ribbon flowers just as she did when she was a kid.  Very cute and pretty easy once you get the hang of it.


OLYMPUS DIGITAL CAMERA


All you need is some ribbon (thickness will determine how big the flower head ends up being), some felt if you would like to add leaves, styrofoam ball, wooden skewer and some pipe cleaners for the stem.  Step by step photos and instructions can be found by running over or clicking on the picture gallery below.


OLYMPUS DIGITAL CAMERA


Valentine Craft, Love Heart Door Hanger Part 2

Standard
Valentine Craft, Love Heart Door Hanger Part 2

This is another variation of our earlier Valentine Door Hanger , the main difference is rather than hanging the hearts from strings, we hot glued them to a flat ribbon.  The finer details can be found in the previous post or by hovering over the images below.

valentine3


Method and recipe for making the hearts can be found on the previous blog entry.

Valentine Craft, Love Heart Door Hanger.

Standard
Valentine Craft, Love Heart Door Hanger.

We made 2 different variations of valentine door hangers, but both styles use the same materials.  The hearts are made from salt dough, the same as those DIY Christmas ornaments you see all over Pinterest. There is plenty of recipes and methods available online.  The bows are a basic bow that again you’d see on Pinterest.  There is hundreds of bow tutorials all over the internet too, but I kind of made it up as I was going along.  

IMG_4398

We used the following recipe

  • 1 1/2 cups plain flour
  • 1/2 cup fine table salt
  • 1 tablespoon vegetable oil
  • 2/3 cup chilled water

Mix all ingredients as you would biscuits, using some extra flour as necessary along the way to stop it sticking.  Roll out 7mm thick, cut into shapes then bake at 120C for 2.5 to 3 hrs.  Once cooled, we painted them with craft acrylic paint.

The top bow feature for this one was made by cutting 4 equal lengths of ribbon, putting a small line of hot glue in the centre of one at a time, folding each end into the middle to create a single bow shape.  Then doing the same with the next ribbon, pilling them up as I went.  You can see this in the photos.  Finished off with a button.

Then it was just a case of threading the hearts, adding some extra ribbons and glueing all together at the back.

doorhanger

Sew-less Softie. Easy Craft Project.

Standard
Sew-less Softie.  Easy Craft Project.

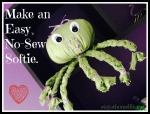
This was one of those moments I love, when something just pops into your head and you think ‘yes, yes, yes I know what we’ll do!’ and it WORKS!   Originally it was supposed to be an octopus (8 legs) but Mr3 is calling it a spider and I think it looks a bit like a jellyfish, so what ever floats ya boat I suppose!

octopus


Mr8 chose green fabric, but I really wish we had used something a bit more fun.  The purple and white string livens it up a bit though.  Just run over or click on each photo for the steps.


Turn Recycled Cans into Cute Garden Ornament

Standard
Turn Recycled Cans into Cute Garden Ornament

This little piggy went to market…  And this little piggy just wants to play in the garden!  How cute is this? Made from recycled cans and a tin bucket, some pink paint, wire and a few screws!

OLYMPUS DIGITAL CAMERA

The assembly process was very similar to the Tin Can Men from a few days ago. You can see how they did it in the pictures below. I want one!

OLYMPUS DIGITAL CAMERA


This clever school holiday project is bought to you by All Tizzied Up.  If you are in Australia and in need of some bows, check out their page.

Heart Garland, Valentines Craft Project

Standard
Heart Garland, Valentines Craft Project

Valentines day is not a huge thing here in Australia, like Halloween (we obviously don’t have Thanksgiving or 4th of July celbertons either) but it is one bandwagon I am willing to get on for the craft side of things at least.  Also willing to accept all donations of fine jewellery and flowers, lol.


IMG_4339


I originally wanted to make these 3D, but I couldn’t work out what to use as a frame for them that could be removed late (like a balloon), so I just went with flat ones.

The whole things was a bit of an experiment for me too, as I have never played with liquid starch before (took me 6 months to even find it).  The white ones I just used straight starch, and the red ones I used a corn flour and starch mix, roughly 50/50, with a dash of food colouring.  The ones with the corn starch turned out much firmer, but the white ones were still firm enough to work with.  Once completely dry, I traced out heart shapes with a black marker using cookie cutters.  Cut the shapes out with sharp scissors and threaded them up – ready to hang.

heart garland


Tin Can Garden Men! School Holiday Project

Standard
Tin Can Garden Men! School Holiday Project

I must say I am quite jealous of all the projects the girls at All Tizzie Up are doing this holidays.  I have been so swamped with work and other obligations I just haven’t had the time or energy to get any of the things I wanted to done. But that will change!  In the meantime, I am very happy they are helping keep my blog active!  Here is some cute little tin can men they made using recycled cans, wire, paint, beads and some bells.


OLYMPUS DIGITAL CAMERA

Watch the slide show or click on the images for step by step instructions to make your own recycled can garden critters.


This slideshow requires JavaScript.

OLYMPUS DIGITAL CAMERA