Category Archives: Home Made Gift Ideas

DIY Party Favours

Standard
DIY Party Favours

We only have parties every 3rd birthday in our house as organising parties for 4 kids every year would be a full-time job (plus I’d need a 3rd job to pay for them).  So when we do have a party, I like to try to make it ‘next level’.  This month my daughter will be having her 9th birthday party with 10 close friends at home.  I thought rather than just the usual party bags filled with cheap lollies and plastic noisemakers, I’d try to make it a bit more grown up and special for them.  Here is one of the ideas we came up with to include in the party favours.  They worked out to $1 each and took about an hour for the 2 of us to put together.

You can purchase these packs studs in an assortment of colours and sizes from most Kmarts for just $2.  With only 10 guests we just split a pack in half, but there is no reason you couldn’t break them down further if you were to have more guests.

Image from http://www.kmart.com.au/

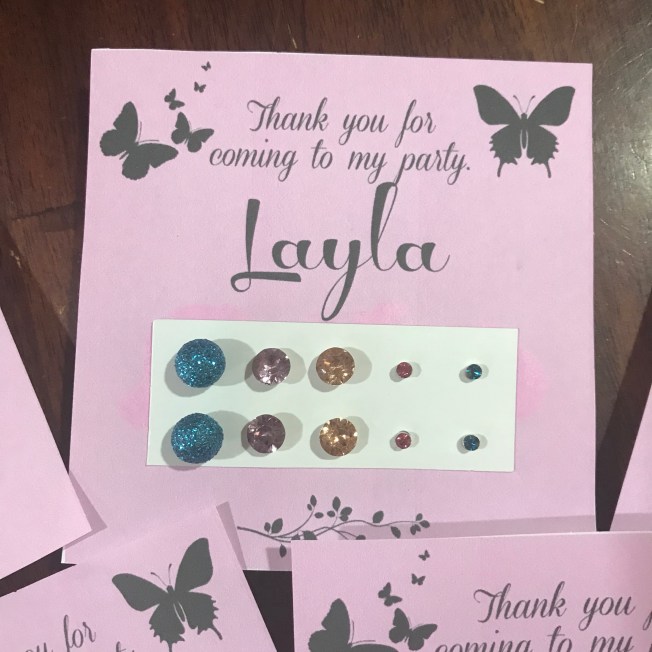
The background ‘thank you’ note was created on PicMonkey which is a really fun and easy editing website that even the kids can navigate. I inserted the image into a Word document to make it easier to adjust the size and estimate how big they needed to be on an A4 page.

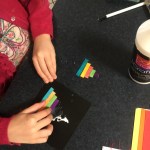
Once we decided on an appropriate size for our image, we simply printed and cut them out and stuck on the strips of card that came with the earrings, using a glue stick.

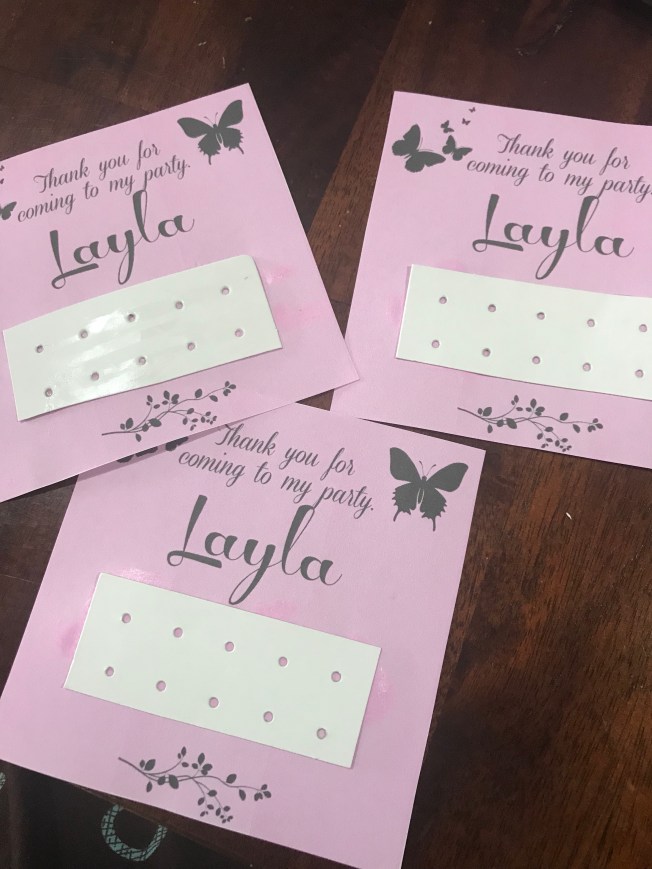
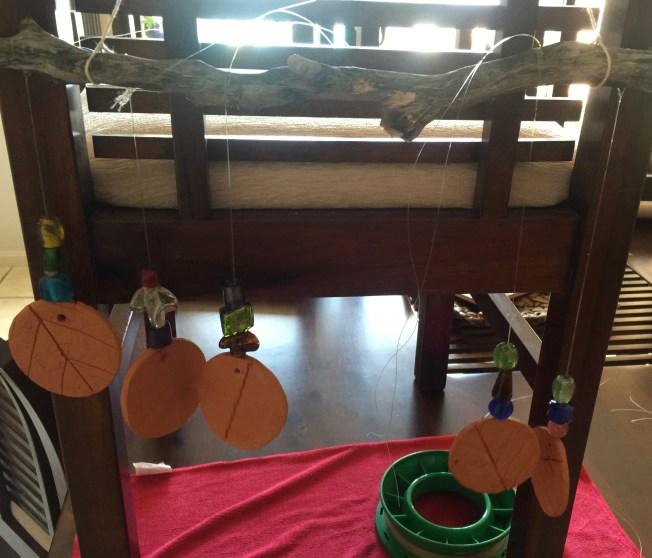
Then it was simply a case of transferring the earrings over to the new home pushing them through the pink layer of paper.

If you plan on doing this project buy one more pack than you need as unfortunately some of them did break as we were removing from the cards – but at $2 for 10 pairs it’s hardly worth complaining about nor making another trip to Kmart. 🙂

And there you have it.  Thank you cards with a gift, all for $1 each plus a bit of ink and paper.  Happy party planning. 🙂

Rustic Clay Wind Chime

Standard
Rustic Clay Wind Chime

It has been entirely too long between entries.  Life gets like that though I guess. I actually made this wind chime back in May, but have not had a chance to blog about it. Pretty sad when you can’t find a spare half hour in 7 months… but hopefully I will make up for that over the next 3 weeks while my schedule is not so hectic.

I am really happy with the way this project turned out, but it may not be something everyone can make at home, as you will need access to a kiln for the baking of the clay.  I am lucky enough to have that access 🙂  The discs were made from potters clay, available from any good craft shop, about $30 for 10kg (it’s really heavy when wet!). I rolled some clay out to around 5mm thick, then cut the circles out using a metal egg ring.  I then used a variety of leaves and flowers from around the garden, laid them over the clay and rolled over gently with a rolling pin, just enough to create the patterns as you can see.

Clay craft

Clay circles with leaf and flower prints.

Once baked and cooled, it was time for assembly.  Mr 5 and Miss 6 were happy to help decorate the pieces of fishing line with some chunky transparent glass beads I had in my bead stash.

Threading beads

Threading the beads on fishing line before assembly

We then went on a hunt for the perfect stick, attached it to a chair and began assembly.  I wanted the discs to taper down, so this was not something the kids could help with.

Assembly of wind chime

Assembling

Once I was happy with the positioning of each string, I tied them in a few more knots and decorated the top hanging twine.  Cut off any loose ends and it’s done.  As simple as that.

IMG_8881

Each disc touches the next ever so slightly, making a lovely sound in the breeze, without being too noisy.

IMG_8873


Simple Christmas Card Ideas – Part 2

Standard
Simple Christmas Card Ideas – Part 2

Christmas craft that doubles up as a math lesson! Hehe.

This activity really doesn’t require much explanation.  All you need is some paddle pop sticks, sharp scissors or secateurs, some craft glue and card stock. Work out how tall you want your tree.  If you want to make a pattern, decide on that now too. We just went random.  Measure out on the sticks 1cm, then 2cm on the next one, 3cm and so on.  Cut the sticks where you have marked them.  Set them out on the table then add a generous amount of glue to your card, stick them down and you’re done!

We added a little green tree trunk to ours too, but that is optional.  You could also add some other little squares of stick as decorations if you wanted.

Paddle pop Christmas Tree.

Paddle pop Christmas Tree.

Simple Christmas Card Ideas, Part 1.

Standard
Simple Christmas Card Ideas, Part 1.

Here’s a simple card decoration idea that doubles up as a fine motor activity.

For all the card projects this year I am using plain black card stock.  They were $2 for a pack of 12 at a $2 shop.

For this project you will need some coloured paper or thin cardboard, craft glue and any decorations you like (we kept it simple with an angel sequin)

Trace out a tree shape on the back of one of the pieces of paper.

IMG_7222

Fold the other coloured paper in half to double it over then bring all 3 pieces together and cut along the outline so you end up with 3 identical shapes.

IMG_7223

Using a pencil draw some lines across the back of one of the trees.  Then tear carefully along the lines as demonstrated by Ms5

IMG_7225

Cover the other colour tree completely with glue, then stick down every second piece of torn paper.

IMG_7228

Allow to dry and secure to your card stock 🙂

Torn paper christmas tree.

Torn paper christmas tree.

Egg Carton Daffodils – School Holidays Craft

Standard

School holidays!  Woot! First cab off the rank, these simple little daffodils made from egg cartons.

IMG_5949


All you need is an egg carton, paint, pipe cleaners or skewers, glue.  I used split pins to attach the centres to the petals, but you could just glue them too.  One carton makes 5 flowers.

IMG_5926


Cut the centres first, as shown above.  Then cut out 5 of the cups to make neat little flowers.  Daffodils technically have more than 4 petals, but I just worked with 4  as the egg cups have a squarish shape and it was easier to cut that way.

Paint the middle sections inside and out.  We used orange, but you could use any colour you like.  Then paint the outers a lighter colour.

Once dry, I poked some holes through the centre of each piece and using pliers inserted a gold split pin (my fingers wouldn’t fit in there, so had to use pliers).

For the stems, pipe cleaners would have been easier, but I decided to use some skewers wrapped in green raffia.  It gave them a more natural texture.  I secured the raffia at each end with some sticky tape.

Then it was simply a case of attaching the stems to the flowers.  I used hot glue for this.


DIY Hidden Object Game

Standard
DIY Hidden Object Game

I saw one of these in a game shop last Christmas, I thought it was very cool but not “I’m happy to spend $40 on this” cool.  It just looked far too easy to make myself.  Turns out I was right. You could make these in any shape or size, and fill them with just about anything.  We had all these things in the house already, so it was fairly inexpensive.


rice.2.jpg


There is several methods for colouring rice on the net, but I was looking for quick and simple.  The blue and red we made with just food colouring and a dash of water, mixed well then laid flat to dry.  The yellow we used vinegar in place of the water (some recipes asked for rubbing alcohol but we don’t have any of that).  The yellow dried about 3 times faster than the other 2, so that is the way to go.  Instead of placing the trays in the sun, I just put them in the oven at 50C with the door open.  The red took about an hour to fully dry (it took the longest).  I did stir it around occasionally to prevent any sticking and distribute the wetter rice.

Mixing the colour and spreading out to dry.

While that way drying we hunted around the house for appropriate goodies to put inside.  We came up with 20 items.  The amount of items you want to use will depend on your container size.  I think we could have easily used twice as many, but it was still a good ratio.  The items varied in weight and texture.

It would have been easier to mix all the rice colours together prior to filling the container, but the kids enjoyed layering the different colours with a few objects between, then shaking to mix at the end.

The container we used was an old straw holder. You can buy them full of straws at the grocery store for around $4.  It did have a hole in the top, but this actually came in handy as a place to insert a ribbon and attach the key to what is inside.

I took a photo of all 20 items, shrunk it, then printed and covered in clear contact.  Attached to the ribbon on top.  If you were to just use a clear water bottle or similar, you could just tie something to the neck of the bottle.

The key

The key

Once everything was put in and we were happy with the level of rice, I taped it up nice and tight.  And that’s it.  Some of the lighter items are easy to find and often pop up to the top, but theres several things we have not managed to find again, like the smily badge and dinosaur!

The kids really enjoyed this project and were able to be involved every step of the way.  It was a bit messy, but over all a success.

Make Your Own Easter Head Bands

Standard

The girls at All Tizzied Up had a busy weekend doing Easter craft. Their first creations were these cute little hand made head bands.

Mum has taken step by step photos that do all the explaining themselves.

Preview


OLYMPUS DIGITAL CAMERA

Cardboard Roll Easter Chicks – Kids Easter Craft.

Standard
Cardboard Roll Easter Chicks – Kids Easter Craft.

I’d like to say I came up with this all on my own, but that would be a lie.  Ms5 and I made some owls inspired by this post from   Kerrys Craft Blog.  It was from this concept that I came up with these easter Chicks.  I thought the fact you can hold eggs or treats in them was ideal for an easter craft project.

IMG_4814


All you need is some coloured paper, cardboard rolls, tape and glue.  You can make them just as cute without the feathers, goggly eyes and pipe cleaners, but if you have some of those handy, you could use them like we did too.   The main difference between these and the owls is that the top and bottom folds are in opposite directions to each other, so the head comes to a peak in the middle rather than making two ears like the owls have.  The rest of the instructions can be found by running your curser over or clicking on the photos below.


easterchicks

School Hair Clips and Hot Glue Burns.

Standard

So Ms5 started big school this year and she has been wearing lovely hair bows every day thanks to the wonderful All Tizzied Up.  But I figure at the rate we lose hair bands in general, she will soon be requiring more.  So I thought I’d give making some a go.

IMG_4803

I ordered a stack of plain clips from ebay, I think it was $5 for 100 or something equally ridiculously cheap.  The ribbon was the only kind in the school colours that I could get my hands on at the local $2 shop.  The various widths limited my design options, but I am pretty happy with the results for a first attempt.

IMG_4800

I have been warned by the pro not to get addicted! I can see how easy that might be though!  Beside the row of buttons one, they are all basically just loops or figure 8s of ribbon, glued on top of each other.  The buttons nicely cover up the mess in the middle too!  Might have to watch some tutorials on other kinds of bows when I get my hands on some more ribbon.

IMG_4806

By the way, just in case anyone was not aware, hot glue burns like fire.  Yep, true story, just ask my finger.

Sew-less Softie. Easy Craft Project.

Standard
Sew-less Softie.  Easy Craft Project.

This was one of those moments I love, when something just pops into your head and you think ‘yes, yes, yes I know what we’ll do!’ and it WORKS!   Originally it was supposed to be an octopus (8 legs) but Mr3 is calling it a spider and I think it looks a bit like a jellyfish, so what ever floats ya boat I suppose!

octopus


Mr8 chose green fabric, but I really wish we had used something a bit more fun.  The purple and white string livens it up a bit though.  Just run over or click on each photo for the steps.


Rainbow Tutu Bag. With Step By Step Instructions.

Standard
Rainbow Tutu Bag.  With Step By Step Instructions.

How cute are these? And so simple to make if you can get your hands on a few cheap materials. All Tizzied Up and her girls put these together as little Christmas gift bags.

tutubag2


All you need is some tulle in your choice of colours, a cheap elastic headband and some small calico or reusable bags (available at most $2 shops) and some ribbon or other embellishments if you choose.  Oh, and a hot glue gun, of course!

Cut the  tulle into lengths long enough to reach the bottom of your bags when folded over.  For these bags, that was 30cm. You can buy tulle in 15cm wide rolls, this makes the job a lot easier than cutting the strips from a large piece, it is quite fiddly to work with.  Fold the now cut strip of tulle in half and push the folded part through the bottom row of the head band so it is poking through a little, then thread the 2 loose ends through the loop you have just created and pull tight.  Repeat this process right around the head band.  Stretch over the bag and hold in place with a few spots of hot glue.

For the embellishment on the above bag, several ribbons were secured with hot glue, then piled together and stuck down, finishing off with a fabric embellishment.  You could use anything though, buttons, curly ribbons, or just leave it as a plain skirt.  Here is another example that All Tizzied Up made for my DD as she is a huge Peppa fan.

IMG_4180


More detailed instructions available by running over the photos below.


Chocolate Cranberry and Pistachio Christmas Treat.

Standard
Chocolate Cranberry and Pistachio Christmas Treat.

A good friend makes this recipe each year as just a large slab that she then cuts into squares (or shards as she calls them, lol), The colours just look so pretty together, so I thought I’d take it a step further and make an edible decoration out of it!

chocolatetree


There really is no recipe as such, and the method is as straight forward as it looks.  Heat chocolate until smooth and runny. You could use any kind of chocolate you like, milk, white, dark, I used a store brand milk cooking chocolate.   You can just pour it out onto a flat surface or use some cookie cutters like I have.  While still runny, sprinkle with your favourite fruit and nuts, pistachio and cranberry work well at this time of year as the colours are what I consider “Christmassy”.  Dust with edible glitter if you like, but it still looks yummy without!  


image


How the flat versions can turn out

Home Made Teacher Gifts, Peppermint Bath Bombs

Standard
Home Made Teacher Gifts, Peppermint Bath Bombs

It’s that time of year again folks. Time to thank the dozen different day care providers, half of which I don’t even know the names of, for putting up with my darling children 2 days each week.

This year I decided to make something that all the kids could help with, as last years gift required minimal effort from the kids.  So we made Bath Bombs and I am happy to report they were a success (we tested one out last night!) 

bathbombs

I used 2 different recipes, the first one was here

Dry ingredients: 

  • Baking Soda – 8 ounces
  • Citric Acid – 4 ounces
  • Corn Starch – 4 ounces
  • Salts – 4 ounces

Wet Ingredients:

  • Water – .75 tbsp
  • Essential or Fragrance Oil – 2 tsp (I used peppermint, as it is Christmassy)
  • Oil – 2.5 tbsp
  • Food coloring – 1 or 2 drops
  • .

For the pink lot, I used this recipe

You’ll need:

  • 1 1/2 cups bicarbonate of soda
  • 1/2 cup citric acid powder (use fine grade, available from chemists or pool supply shops)
  • Sieve
  • Potpourri or herbal teabags such as chamomile, lemon, rosehip or peppermint
  • An essential oil such as peppermint, lavender, geranium
  • Sweet almond oil (I just used vegetable oil)
  • Food colouring
  • Rubber gloves
  • Moulds from craft shops

Which came from here

The method I used for both was the same though.  Mixed all dry ingredients in a large bowl, then had Mr8 ever so slowly pour in the wet ingredients while I stirred like a mad woman.  With the second recipe, it doesn’t actually call for corn flour (starch) but I decided to throw a handful in just to make the recipe go further.  The second lot stuck together better than the first recipe while wet, but they have both dried lovely and firm and both fizz wonderfully in the bath tub.

We made the round ones in some empty plastic Christmas ornaments like the blogger in the first link did, as well as some smaller ones in some Aldi silicone trays.  If I was to make them again, I think I’d find a mould that was spherical, but a bit smaller, so you end up with more bombs from your mix.  I left the silicone tray ones to dry over night, and they popped out easily the next day.

It is summer here right now, and humid, which can destroy the bombs.  So before putting them in the little draw strings bags ($2 for 5 at the cheap shop) I wrapped them in cling wrap to protect them from moisture.

Added a little thank you note and Merry Christmas tag to the bags and we are ready to drop them off.

Make Your Own Sensory Santa Slime.

Standard
Make Your Own Sensory Santa Slime.

Ok, so the school holidays have not quite started here, but this looked like too much fun and I had a fairly light schedule for the day, so we gave it a go.  The best part is, unlike normal play dough, it is not going to go bad when stored between uses.

sensoryslime

The recipe I followed required Elmers Glitter Glue, but after searching everywhere in a 20km radius I was still empty handed.  Apparently Elmers is available in Australia now, but from what I can tell it is only the white stuff, and I really wanted the clear version for this project.  So I just used non toxic craft glue, added my own glitter and was thankfully able to achieve the results I was after.  The recipe came from this delightful blog  

Santa Slime Recipe 

Combine the above ingredients in a bowl
 In a separate bowl combine
  • 3/4 teaspoons of borax
  • 1 & 1/3 cups very warm water
Once the ingredients of both bowls are mixed, combine them and mix, the slime will form almost instantly.

– See more at: http://www.growingajeweledrose.com/2013/12/santa-slime-recipe.html#sthash.MROKZyw1.dpuf

As I mixed up the ingredients I found it very hard to believe it needed all that water – but it really did, and then some!  Not sure if it was because I used so much glitter or because the make up of the glue I used was different than Elmers, but it turned out really firm, almost like play dough, and certainly didn’t ooze like I anticipated.  After I got over the initial disappointment, I figured I could either spend another $11 on glue or try to fix it – had nothing to lose, so I added more water to a section of it in a bowl (which did nothing while cool) and put it in the microwave for 2 minutes.  Yes, it worked, the slime took on more water and began to get runnier.  I continued to do this in sections, increasing the time in the microwave and the amount of water until I had the desired texture.  

The kids have been having heaps of fun with it, even the older 2.  We ended up with about 3 litres of slime after adding all the extra water, so plenty to share between the 4 of them.  If I make it again using the same glue, I will use twice as much water from the start, because adding some extra borax to thicken will be a lot easier than adding extra water was!

D.I.Y Leaf Print Christmas Cards

Standard
D.I.Y Leaf Print Christmas Cards

Here’s a unique home made card idea that the whole family can get involved in.  All you need is some card stock, paint (brush and roller), sequins or other bling and some tree shaped leaves.  Glitter optional!

leaf print

Coat the leaves in a thick layer of paint, we used white as I thought it would stand out nicely on the black card.  Place the leaf, painted side down, carefully on the card, then roll over it with a clean dry paint roller to press down.  Remove leaf and you should have a pretty leaf print.  If you want to add glitter, do so now while the paint is still wet so it sticks.  If you are creating more than one card, just give the roller a wipe with an old rag between leaves to remove any paint and avoid smudges.  Once dry, let the kids decorate with sequins, we used PVA to attach them – done.

DIY Wind Chime, Candelabra/Sun Catcher.

Standard
DIY Wind Chime, Candelabra/Sun Catcher.

I dragged the kids to the $2 shop to stock up on some supplies for other projects, and came across these cute little glass bottles.  I had to have them.  And I had to use them right now!  So much for Halloween craft this week! lol.

IMG_3485

I didn’t have a small enough pre made wreath wring to use as the frame, so I just used some gardening wire and platted it loosely along with a piece of twine.  I like the rough look it gave and thought it fit well with the theme.  The little glass balls were another score from the junk shop, they are actually part of a floating candle set, but I had bigger ideas.  I love those old glass buoys as decorations so I figured these could be made into mini ones.  I slightly filled the little jars with some crushed crystal beads I bought off eBay years ago, just to add some colour, then tied them all up.  Originally I was going to position each one, stepping them down as I went, but as they were all different heights and widths, it just didn’t give a worthwhile effect.  So I just tied them randomly, but so they would still hit each other to make a noise in the wind.   The candle holder in the middle was a last minute decision, I just thought it was missing something, and that finished it off perfectly.  To be honest, I wouldn’t leave the candle lit unattended, as those strings are flammable, maybe a battery operated tea-light would be a better idea.


Anyway, I am pretty happy with it.  I think I will do it again, after I collect some larger bottles to hold more candles.  Create something a little different again, and probably use wire to hang them next time.

IMG_8043

The finished product

The finished product

If you would like to see more craft and DIY projects like this one, please follow my blog and Pinterest.


Halloween Craft For Kids, Finger Print Gift Tags

Standard
Halloween Craft For Kids, Finger Print Gift Tags

I love finger print critters, and had never actually made them with my kids.  So this seemed like the perfect opportunity.  A bit of parent help is needed for the finishing touches, but there is plenty of steps the little kids can help with along the way.  You can click on the pictures for more detailed instructions, but it is all pretty straight forward as you can see.

IMG_8028


All we used was some card, white paint, googly eyes (and some sequins) silver paint pen, ribbon, clear cellophane, and lollies to fill.

Halloween Toddler Craft, DIY Treat Boxes

Standard
Halloween Toddler Craft, DIY Treat Boxes

I know many Australians still have not accepted Halloween, ‘it’s a silly American tradition’, even though it is not American, but anyway, they really should, because it is heaps of harmless fun and the kids love it.  Our new neighbourhood really gets into it, I think I enjoy it more than Christmas!

But of course, it’s not just about the dressing up and lollies, halloween craft is lots of fun too. Maybe it’s because I am new to it, but it seems so much more fun than Easter and Christmas craft.  Today I just did a simple project with the little kids as the older 2 were not home.  I had another idea in my head, but have decided to keep that for later in the school holidays.  I am hoping to get quite a few Halloween themed projects in over the next 2 weeks while the kids are off.

I cut out some Halloween shapes in the potatoes while Ms4 gathered the paint and plastic plates.  The boxes were just from the grocery store, but they are available at many places, $2 shops etc. We had to allow each side to dry before doing the other side, as you need to apply pressure for best results, rather than trying to stamp the assembled boxes.  Once both sides were dry we applied another coat of glitter paint, and some embellishments, again, one side at a time.  The weather was nice today so the whole project only took a couple of hours even while waiting for things to dry.


I am pretty happy with the results.  Would have liked some different coloured boxes for variety, and was disappointed we are out of black paint for the bats, but over all, not bad for an afternoons work.


Halloween1

Autumn Theme Mobile, Using Oven Bake Clay

Standard
Autumn Theme Mobile, Using Oven Bake Clay

I have had this idea in my head for a while, but wasn’t sure what medium to use.  This product is really fun and easy to work with, however, it sets more like a hard rubber than a ceramic clay, so it did not achieve the wind chime noise I had in mind.  Oh well, its still pretty!


Nature theme mobile / sun catcher.

Nature theme mobile / sun catcher.

Teaching Kids To Sew – Make a Hair Scrunchie!

Standard
Teaching Kids To Sew – Make a Hair Scrunchie!

I was just saying to my other half, I find it odd how many people think the ability to use a sewing machine is something rare or difficult. He agreed that it is very simple, no harder than driving a car. 2 minutes later as I was taking up Miss 4s curtains, I managed to catch the middle of the curtain in the seam, creating a huge unpicking job, and of course my quick-un-pick has grown legs and run off, so I had to do it the hard way. Murphy and his law are cruel, and now I see why many people choose not to sew!

That aside, I still think we should all learn the basics of sewing, even if the days of making your own clothes to save money are long gone (fabric is SO expensive!). So when my boys showed interest in sewing after my last little project, I jumped at the opportunity to teach them some basics on the machine. The easiest thing to sew has to be a scrunchie!

The process is very straight forward, so I am sure I don’t need to go into much more detail than what is in the caption on the pictures. Apart from a pretty wonky seam by Mr9 (which you can’t notice once finished), they were a success and Ms4 was happy to model their efforts to the world. We used fabric with lines on it as I figured that would be easier to follow for beginners, but you can use just about anything, make them any size and thickness.

Gotta love a bit of 90s hair fashion! Where’s the crimper!

20130718-191439.jpg