Monthly Archives: January 2014

Valentine Craft, Love Heart Door Hanger Part 2

Standard
Valentine Craft, Love Heart Door Hanger Part 2

This is another variation of our earlier Valentine Door Hanger , the main difference is rather than hanging the hearts from strings, we hot glued them to a flat ribbon.  The finer details can be found in the previous post or by hovering over the images below.

valentine3


Method and recipe for making the hearts can be found on the previous blog entry.

Valentine Craft, Love Heart Door Hanger.

Standard
Valentine Craft, Love Heart Door Hanger.

We made 2 different variations of valentine door hangers, but both styles use the same materials.  The hearts are made from salt dough, the same as those DIY Christmas ornaments you see all over Pinterest. There is plenty of recipes and methods available online.  The bows are a basic bow that again you’d see on Pinterest.  There is hundreds of bow tutorials all over the internet too, but I kind of made it up as I was going along.  

IMG_4398

We used the following recipe

  • 1 1/2 cups plain flour
  • 1/2 cup fine table salt
  • 1 tablespoon vegetable oil
  • 2/3 cup chilled water

Mix all ingredients as you would biscuits, using some extra flour as necessary along the way to stop it sticking.  Roll out 7mm thick, cut into shapes then bake at 120C for 2.5 to 3 hrs.  Once cooled, we painted them with craft acrylic paint.

The top bow feature for this one was made by cutting 4 equal lengths of ribbon, putting a small line of hot glue in the centre of one at a time, folding each end into the middle to create a single bow shape.  Then doing the same with the next ribbon, pilling them up as I went.  You can see this in the photos.  Finished off with a button.

Then it was just a case of threading the hearts, adding some extra ribbons and glueing all together at the back.

doorhanger

Sew-less Softie. Easy Craft Project.

Standard
Sew-less Softie.  Easy Craft Project.

This was one of those moments I love, when something just pops into your head and you think ‘yes, yes, yes I know what we’ll do!’ and it WORKS!   Originally it was supposed to be an octopus (8 legs) but Mr3 is calling it a spider and I think it looks a bit like a jellyfish, so what ever floats ya boat I suppose!

octopus


Mr8 chose green fabric, but I really wish we had used something a bit more fun.  The purple and white string livens it up a bit though.  Just run over or click on each photo for the steps.


Turn Recycled Cans into Cute Garden Ornament

Standard
Turn Recycled Cans into Cute Garden Ornament

This little piggy went to market…  And this little piggy just wants to play in the garden!  How cute is this? Made from recycled cans and a tin bucket, some pink paint, wire and a few screws!

OLYMPUS DIGITAL CAMERA

The assembly process was very similar to the Tin Can Men from a few days ago. You can see how they did it in the pictures below. I want one!

OLYMPUS DIGITAL CAMERA


This clever school holiday project is bought to you by All Tizzied Up.  If you are in Australia and in need of some bows, check out their page.

Heart Garland, Valentines Craft Project

Standard
Heart Garland, Valentines Craft Project

Valentines day is not a huge thing here in Australia, like Halloween (we obviously don’t have Thanksgiving or 4th of July celbertons either) but it is one bandwagon I am willing to get on for the craft side of things at least.  Also willing to accept all donations of fine jewellery and flowers, lol.


IMG_4339


I originally wanted to make these 3D, but I couldn’t work out what to use as a frame for them that could be removed late (like a balloon), so I just went with flat ones.

The whole things was a bit of an experiment for me too, as I have never played with liquid starch before (took me 6 months to even find it).  The white ones I just used straight starch, and the red ones I used a corn flour and starch mix, roughly 50/50, with a dash of food colouring.  The ones with the corn starch turned out much firmer, but the white ones were still firm enough to work with.  Once completely dry, I traced out heart shapes with a black marker using cookie cutters.  Cut the shapes out with sharp scissors and threaded them up – ready to hang.

heart garland


Tin Can Garden Men! School Holiday Project

Standard
Tin Can Garden Men! School Holiday Project

I must say I am quite jealous of all the projects the girls at All Tizzie Up are doing this holidays.  I have been so swamped with work and other obligations I just haven’t had the time or energy to get any of the things I wanted to done. But that will change!  In the meantime, I am very happy they are helping keep my blog active!  Here is some cute little tin can men they made using recycled cans, wire, paint, beads and some bells.


OLYMPUS DIGITAL CAMERA

Watch the slide show or click on the images for step by step instructions to make your own recycled can garden critters.


This slideshow requires JavaScript.

OLYMPUS DIGITAL CAMERA

Toddler Craft, Bottle Cap Beetles

Standard
Toddler Craft, Bottle Cap Beetles

Here’s a cute fine motor activity for the little ones using recycled objects from around the home. Made by All Tizzied Up over the school holidays.

OLYMPUS DIGITAL CAMERA


Hover over or click on the images below for more details.


OLYMPUS DIGITAL CAMERA

Rainbow Tutu Bag. With Step By Step Instructions.

Standard
Rainbow Tutu Bag.  With Step By Step Instructions.

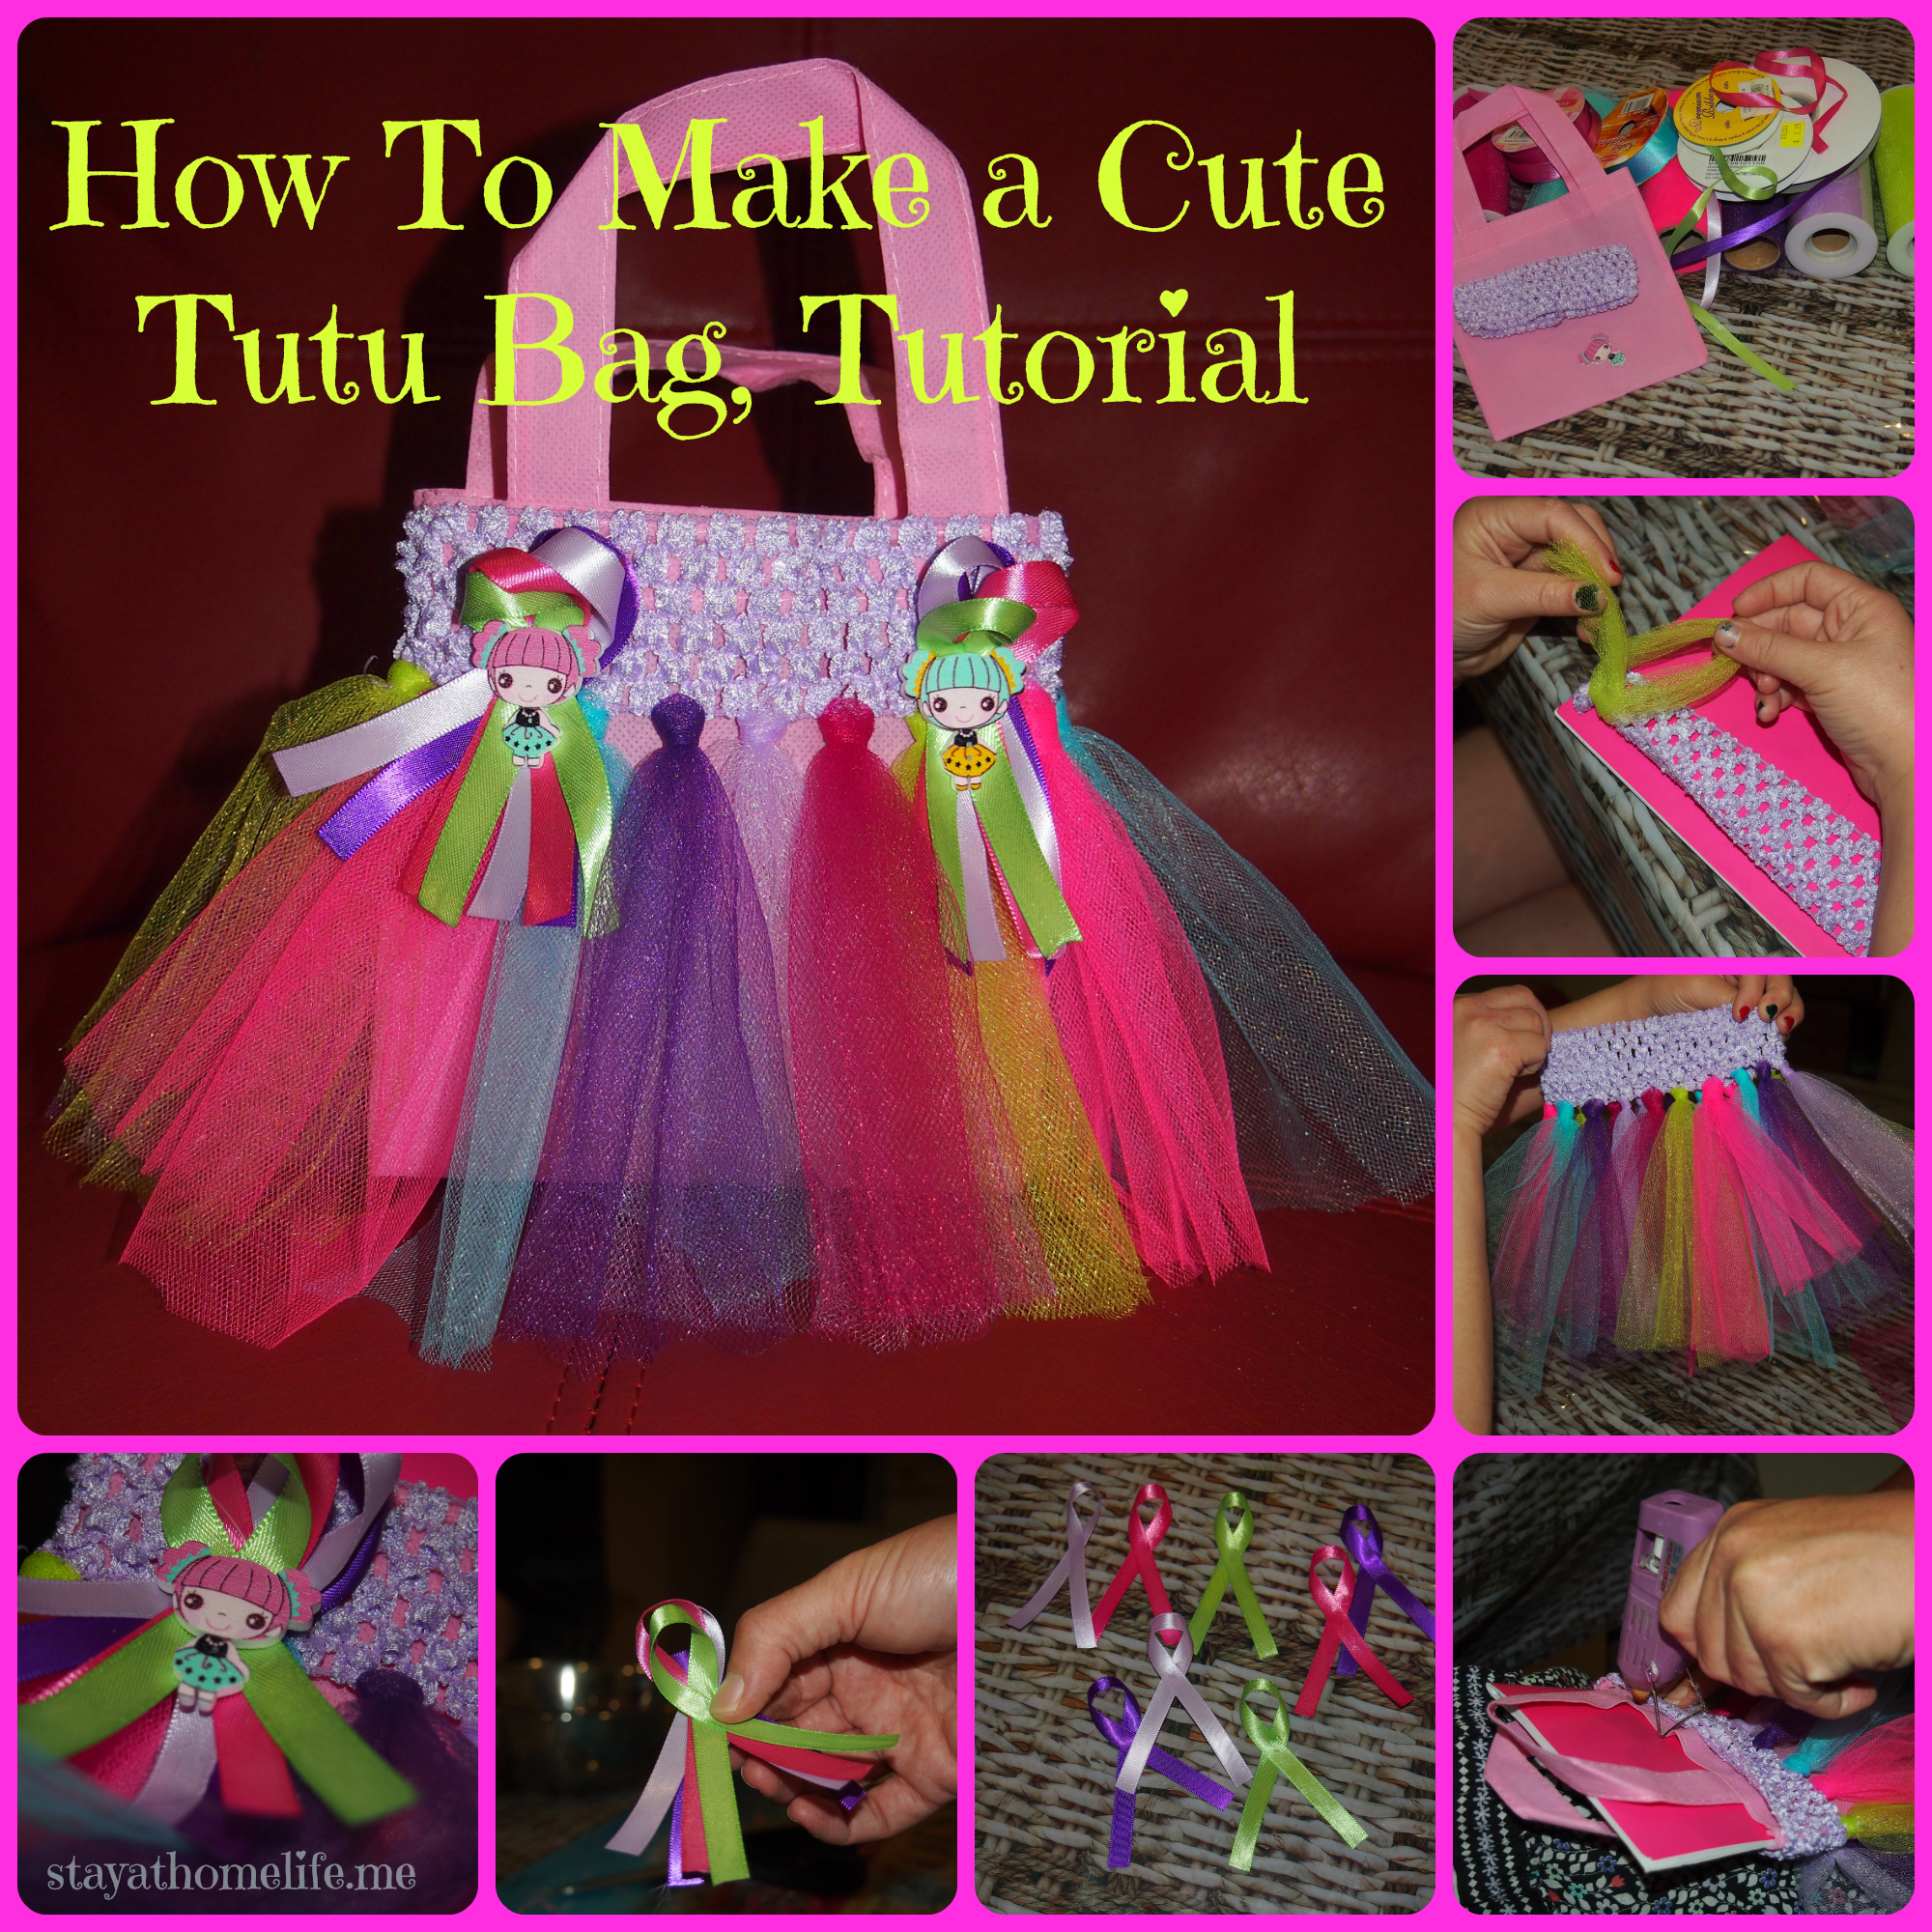
How cute are these? And so simple to make if you can get your hands on a few cheap materials. All Tizzied Up and her girls put these together as little Christmas gift bags.

tutubag2


All you need is some tulle in your choice of colours, a cheap elastic headband and some small calico or reusable bags (available at most $2 shops) and some ribbon or other embellishments if you choose.  Oh, and a hot glue gun, of course!

Cut the  tulle into lengths long enough to reach the bottom of your bags when folded over.  For these bags, that was 30cm. You can buy tulle in 15cm wide rolls, this makes the job a lot easier than cutting the strips from a large piece, it is quite fiddly to work with.  Fold the now cut strip of tulle in half and push the folded part through the bottom row of the head band so it is poking through a little, then thread the 2 loose ends through the loop you have just created and pull tight.  Repeat this process right around the head band.  Stretch over the bag and hold in place with a few spots of hot glue.

For the embellishment on the above bag, several ribbons were secured with hot glue, then piled together and stuck down, finishing off with a fabric embellishment.  You could use anything though, buttons, curly ribbons, or just leave it as a plain skirt.  Here is another example that All Tizzied Up made for my DD as she is a huge Peppa fan.

IMG_4180


More detailed instructions available by running over the photos below.