Easy Christmas Craft – Mini Christmas Trees

Standard
Easy Christmas Craft –  Mini Christmas Trees

Inspiration for this idea came from something I saw at Spotlight.  They used buttons though, which looked good, but buying enough buttons for the project would have blown the budget.  I can’t believe how expensive those things are?

Anyway, What you need.

styrofoam tree shapes, sewing pins, aluminium foil, sequins and sticky tape.

Spotlight also didn’t have any of the cone shape styrofoam in stock, so I bought that from Riot Art and Craft.   They are available in different sizes, I just chose 3 small ones to avoid arguments.

Wrap the foil around the cone and secure with clear tape.  I crumpled up a ball of foil before spreading it out on one, to create a more rippled affect.  I actually prefer how that one turned out.

Once you have the foil secured and are happy with the finish, start placing the pins!  Be careful when working at the top of the cone to point them down towards the bottom as you insert, so you don’t go straight through and poke yourself on the other side.  The kids managed this fine, even Miss 3.  We only had one ouchy, and that was actually me!

Thread sequins onto pin and insert.

This slideshow requires JavaScript.

Christmas Kids Craft, Flat Christmas Tree Decoration.

Standard
Christmas Kids Craft, Flat Christmas Tree Decoration.

Cubby house Christmas tree

So our rainy weekend craft continued into Sunday afternoon.  We started making Christmas decorations!

Materials; scrap card, and any shiny, sparkly or pretty things you have on hand!  We had a pack of Christmas themed sequins from last year that came in handy

We just used a plastic cup to trace around, leaving a small section for the top of the bauble.

Decorate the baubles

We all decorated 2 each.  Some of the decorations had sticky stuff on the back, others required glue.  The kids made sure they used 500 times more glue than they needed – as you’d expect.

Easy Christmas craft - drying

Due to excess glue, we left them over night to dry. Yes, all that white stuff is glue.

Draw half the tree

Draw half the tree

Using a large piece of card board ($1.50 from a news agent), draw the silhouette of one side the tree, starting at the top of the page to get the most out of your $1.50

Fold over and cut out the tree to create a symmetrical shape.

Fold the card over and cut along the line, so both sides are identical.

Fold in half down the centre of the tree and cut along outline, to create a symmetrical tree.  Or, if you’re not OCD about that kind of thing like me, just draw a tree and cut it out!

Place ornament around tinsel.

Loosely position everything to make sure it fits, then start sticking.  We used double sided photo mounting tape so we didn’t have to wait even longer for glue to dry.  The tinsel is stapled at each edge.

Kids craft Christmas Tree

And there you have it!

This slideshow requires JavaScript.

Quick Toddler Craft – Tissue Paper Butterfly Mobile

Standard
Quick Toddler Craft – Tissue Paper Butterfly Mobile

After 2 days of rain the daughter was really tearing her hair out – or was that mine?  I had plenty of work to do, but figured I best take some time out to entertain her.  Once again inspired by ABC Play School  They were making paper butterflies to blow in the wind, so I thought we’d just extend on that idea.

What you’ll need for tissue paper butterflies

What you’ll need; tissue paper (crepe paper would probably work just as well) pipe cleaners, scissors, plastic ribbon and a coat hanger (not pictured)

Twist the paper in the middle

Cut squares or rectangles out of the paper and twist in the middle – as demonstrated by Miss 3.

Twist a pipe cleaner around the middle.

Twist a pipe cleaner around the middle.

Twist a pipe cleaner around the middle.  This is not entirely necessary, but I liked the addition of an extra colour and texture, as well as the antennae look it created.

Attach the string or ribbon

Attach the string or ribbonAT

Attach your string or ribbon, keep attaching as many as you would like.  We just did 3 on each string x 3 strings.

Finished

As a mobile

in the window

In the window

This slideshow requires JavaScript.

And there you have it.  Took less than 10 minutes to create and she thinks they are awesome.

Easy Toddler Craft – Leaf Animals.

Standard
Easy Toddler Craft – Leaf Animals.

Inspired by ABC Play School.  Today we made leaf animal pictures.  It was super easy with minimal mess.

Cutting the leaves for the project

Layla cuts some leaves off our pot plant

DD3 cuts some leaves from our garden.

Leaf pictures

What you need.

What you will need;  Some coloured paper, leaves, marker pens, craft glue and scissors (craft eyes optional)

Leaf pictures

Draw some simple animals to add the leaves too, like this bird.

Draw the outline of some simple shapes on the paper using your makers.

Toddler leaf pictures

Glue on the best shaped leaf for the job!

Start gluing on the leaves that best suit the picture.

Toddler leaf craft

We used the same leaf configuration each time to finish off this bird.

We used the tips of a China doll branch to create this picture.

Toddler leaf craft

Adding the finishing touches.

Adding some boggle eyes, because every kids loves those (ok, and maybe I do too)

Toddler craft leaf bird

One of my favourites

Some of the finished products

The finished products

The finished masterpieces, drying on a flat surface.

Hanging toddler craft

All dried and ready for display.

All dry and ready to display.

This slideshow requires JavaScript.

Glitter Play Dough (Home made)

Standard
Glitter Play Dough (Home made)

After establishing my daughter has low muscle tone, it was suggested by her occupational therapist that we use play dough to warm up her hands before any writing or drawing activities.   Obviously it also has many other benefits, like fine motor, creativity, blah blah, but anyway.  After buying all the different brands and them still ending up dry and ‘ordinary’ after a week, I decided it was time I got off my little b-hind and made our own.  Unfortunately I only had blue food colouring on hand (because the kids always want some in the bath, so we go through a lot :s ) .    I chose this recipe, as it had a 5 star rating.  The only problem is I don’t have nor have ever bought cream of tartar?  So some googling suggested I could omit it for baking powder and vinegar, but the vinegar was going to mess with the liquid content and ohhh, it all seemed too hard.  So, as I do, I figured I’d just do a splash of this and a bit of that.  I used about 1 tablespoon of white vinegar and 2 tablespoons of baking soda.

Ingredients

What you need

I mixed all the dry ingredients with a whisk, then added the water and the rest of the wet ingredients.  It was very wet.

Wet ingredients

All mixed together.

The recipe does not actually tell you how hot to cook it, so I just went with 4, which is just below half way on my cooktop.  This worked well.

Thickening

After just a few minutes it starts to thicken.

I continued working with the whisk to avoid lumps, but eventually it became too thick and was all getting stuck in the middle of the whisk.

Looking just about ready.

I’d call that done.

Soon enough, this is what we had.  I used my fingers to test (first time they came away all sticky, much like a skewer in cake) but then it was just about right.  Surprisingly even though it was still over the heat, it was not very hot to touch.

Adding glitter.

Adding glitter to the cooked dough

I added a vile of glitter, because – well why not?  I did this before the final kneading so it was well distributed.

And there you have it

And there you have it.

And here it is.  The recipe says it makes enough for 4, but I’d say its more for 2.

Playing

Playing

It turned out really smooth and soft.  As demonstrated by Mr Grubby.

Ready to store

Ready for the fridge

The recipe suggests it keeps for up to 6 months in the fridge.  I like the sound of that, I’ll be happy if it lasts 2 weeks.

Creations

playdough creations

Aliens

The Aliens have landed

The recipe;

1/2 cup of salt

1 cup of plain flour (I used SR)

2 Tablespoons of Cream of Tartar (I used 1 tablespoon of white vinegar and roughly 2 tablespoons of baking soda instead)

1 cup of water

1 tablespoon of oil (I used olive oil)

Food colouring (I used a generous splash, probably 2 cap fulls)

Snake Softie – a rainy Sunday activity.

Standard
Snake Softie – a rainy Sunday activity.

Snake softie
So my scrap material collection is looking quite impressive at the moment, I thought I’d give another softie a whirl.  I was ready to make an owl or elephant, but DS talked me into a snake.  That sounded easy enough to make with no pattern.  We discussed how big he would like it and he picked out the colours (to match the colours in his room).

I free hand drew a template for the top ‘scales’ panel of the snake.

Image

Then, with a bit of fiddling around, joined them together, flat edge to flat edge to make the top part of the snake – less the head;

Image

Sewing along the flat side between each section (I only picked the wrong side once, lol)

Image

Image

Make the last panel only a half panel, so the head will eventually be facing forward.  Once sewn, iron flat.  Then lay on chosen fabric for underside of snake.  Trace around the edge to make it the same size.  I drew the underside of the head in at this point too.

Image

For the top part of the head, I cut out and extra diomand shape, cut a slit into the centre of the head, and sewed the diamond in, to create a 3rd dimension.  Don’t forget to add the eyes BEFORE you start stuffing.   Hand stitch along the back of the neck (you can use this opportunity to tuck in and create a bend in the neck too if you like.

Image

Really need to invest in a fabric pencil, to avoid those black lines! lol.

Image

He’s a bit funny looking, but not too bad for a slap together job.  DS thinks he is great, even with his crazy eyes.

The New House – Part 1

Standard
The New House – Part 1

I had a long list of ‘must haves’ when it came to buying this house.  One of which was a decent laundry.  Out of the last 5 houses we had lived in, there was never a bench and I was over the moon actually, to even have a cupboard – lets not even talk about the ones that were part of the garage.  As with just about every other person in the world, I HATE doing the laundry.  So as much as I was looking forward to decorating the rest of the house, I decided to make the laundry as user friendly as possible first.

The blank canvas.

Notice the… nothingness. Oh, but there is space!!!!

We made some measurements to allow for a front loader washer and freezer to optimise bench space.  Took the measurements to Masters and designed the laundry.  At the last minute I decided against a bench the full length of the room and swapped that out for a broom cupboard.  So happy I did this, it fits all the mops, brooms, steam mop, fold away clothes horse, ironing board, all of which I hadn’t actually thought about before!  The existing dryer bracket was in a really bad spot, that meant you couldn’t really lean into the sink.  That, and the door on the washer and dryer opened in opposite directions but were also offset, made it really awkward to transfer loads from one to the other – so I moved it right over to beside the broom cupboard.  This also made fitting over head cupboards within the left over space easier.

At the last minute I decided to sacrifice some bench space for a broom cupboard – it was a good choice!

And finally the finished product.  You can really notice in the bottom photo the difference in tiles, unfortunately we looked everywhere and this was the closest match to the existing tiles.  In real life you can’t actually see the difference though – it was not worth potentially re-plastering the wall to replace the lot.   The colour is actually the same to the naked eye, its just the ripple is slightly different which catches the light differently at this camera angle.  We put the Dyson hand held into one of the over heads and ran the cord out to the plug, to keep things tidy.  A little basket for odds and ends (random pegs and coins found in pockets etc) a nice lush ever green by the window and some artificial succulents to brighten the room  – couldn’t be happier!

Yay!

The cat also has its litter box in the laundry, so it seemed like the logical place to put in a cat door.  There is also a small fold away line  again from Ikea.  Positioned right by the door to hang delicates and my beloved Enjo products that can’t go in the dryer.  I will probably hand a sheer curtain up at some point, but I am willing to wait until I find a good match in a bargain bin, rather than spending $150 on something I don’t really need.

This slideshow requires JavaScript.

The New house – part 2.

Standard
The New house – part 2.

The ‘baby’s’ room.  Ok ok, he is not a ‘baaaabeeee’ anymore, but he is MY baby, dag nabbit!  So he will be a baby for ever more… until there is another baby.  I am after all, still ‘the baby’ to my parents, even as I head into my very very late… 20s.

So, along my life journey I met the wonderful Krystal .  When I say ‘met’ I mean, well, we became mutual internet stalkers of each other… or something like that.  Anyway, that’s not really relevant.  What IS important is that she introduced me to green.  Not just any green, because lets be honest, everyone loves green.  But Kermit, ZOMG, holy shizit that is bright GREEN green.  At first I was like ‘whhhhhhaaat you talking bout Willis?’ and then it hit me.  For months I dreamed of it, how much I wanted it, how it was totally going to work… I HAD to have it.

So, when we moved into our new house, where every child had their own room, I decided to start  my bedroom decorating adventure with the Eli’s room.  The only child that could verbalise no preference.  *Evil grin*.

Elis room is actually a study, so has no built in cupboards.  Thankfully he is impartial to hanging his clothes up, so its not a huge problem.  His window is set within an alcove at the entrance, so the room does not receive a lot of natural light, especially in the afternoon when the sun is on the other side of the house.  Another reason I think the super bright colour is great.

This is a before photo taken in the morning.

We already had most of the furniture for his room, including a big bed.  So part of this project was also to see that he progressed out of the cot by the end.

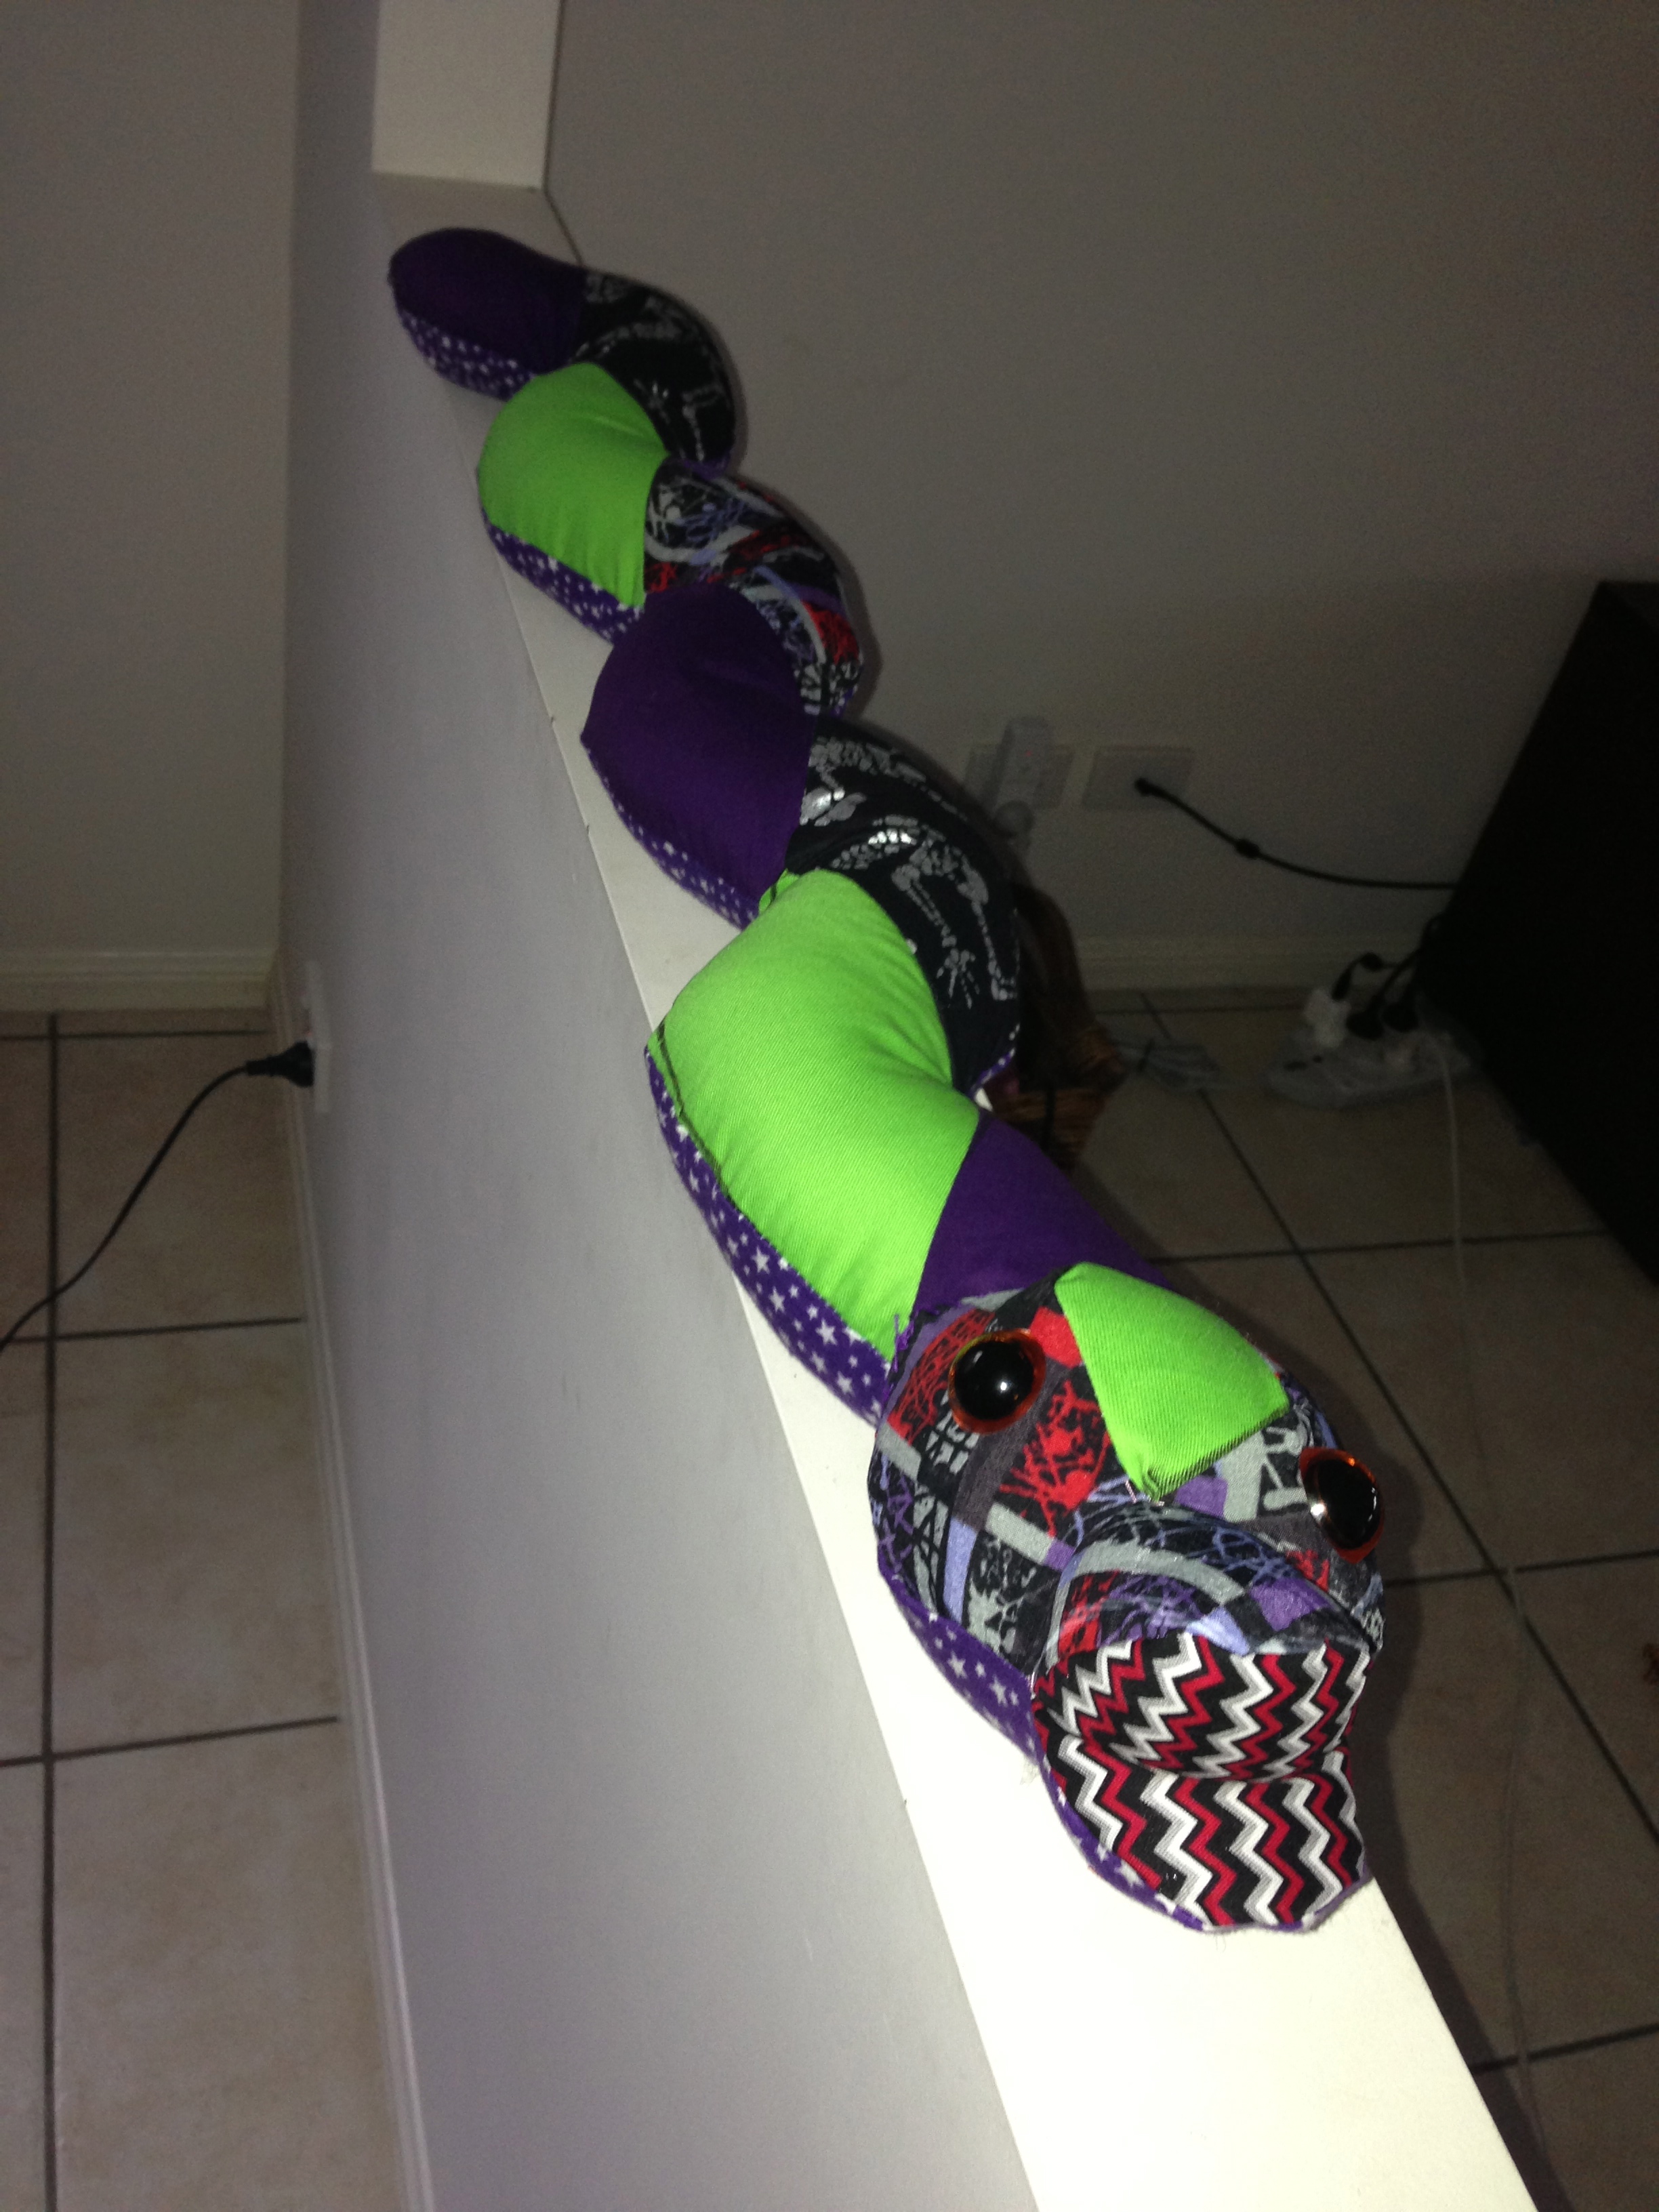
We had already put the dragon light up – because I am impatient like that.

So, a morning of cleaning walls and with the help of my parents, we had the room painted in a day.  By the way, I am THE worst painter in the world according to my father.  Am I?  Or was that all part of my evil plan to get him to take over?  Maybe we will never know, mwahahhahhaa.  Unfortunately due to a iPhoto malfunction, I have lost all progression photos.  Hopefully I will be able to recover them some day and add.  Anyway, the finished product;

Crocodile mirror from Ikea

To complete the room I need to replace the fan with something more modern and sleek.  Once all kids rooms are done, we will be replacing all carpet.  It really feels ‘unfinished’ without the carpet done, but there is no point doing one room at a time, nor is there any point replacing carpet before we have finished painting.  Hopefully it will be done within the next 6 or so months though, then I will update!  Oh, and I am still looking for the perfect rug for the floor.  I want something that contains the right colours, but apparently it does not exists.  So for now, he is just using a red one we already head.

*For where everything was purchased, see individual photos.

This slideshow requires JavaScript.

Spring goodness!

Standard
Spring goodness!

I LOVE SPRING!  Sorry to yell at you all, but seriously?  Best season of the year.   Check out what I found at mums today – a Willie Wagtail  has made a nest in the most picture perfect position.  Like something out of a fairy scene.

Can you see it?


*Updated, the eggs have now hatched.


The hatchlings

The hatchlings.


around 2 weeks

around 2 weeks


2 weeks close up

close up.


Halloween craft for the kiddies

Standard
Halloween craft for the kiddies

Another Pinterest inspired craft activity.  Ours may not have turned out as well as theirs, but it was fun no less.  Well, if you ignore the tonne of glitter that is brightening up the garden, house and every other surface within a 1 kilometre radius.  I recommend you do this one outside!


Styrofoam balls, pipe cleaners, boogly googly eyes, pva or craft glue, black felt or card board, dress making pins to secure the wings.

Coat the balls with a thin even layer of glue using a paintbrush. Sprinkle a generous amount of glitter onto a disposable plate, roll ball until completely covered. Use a little more glue to secure eyes in desired position.

Samples of bats.


Sun Catchers – School holiday entertainment.

Standard
Sun Catchers – School holiday entertainment.

I have a stupid amount of beads that I have collected over the last 20 years and the kids love playing with them. I picked up these ‘diamonds’ on ebay for just over $4 each including postage.

Sun catcher, miscellaneous beads and crystals, string or fishing line, scissors.

The kids couldn’t help themselves and had to smear their slimey little hands all over them as soon as we opened the mail. They are available in 9 different colours. I ordered these just for me and Layla, but now I have had to order another green and clear one for the boys.

Layla demonstrating that it’s child’s play. She added bells, crystals and beads. Butterfly beads of course.

This slideshow requires JavaScript.

School Holiday Entertainment, Snappy Peg Animals.

Standard
School Holiday Entertainment, Snappy Peg Animals.

School holidays entertainment

As we were planning on spending most of the holidays at home, I made it my challenge to do craft and spring cleaning to fill in the days. Todays project was inspired by Pinterest – well actually, most of them are these days.

coloured card, scissors, black marker pen, pegs (wooden pegs would have been better, but this is all I had on hand) strong glue and some boogly eyes.

Halloween inspired ghost.

Keep the shapes simple so they are easy to cut out.

Pretty self explanatory.

Once you have cut out the shapes, cut down the middle, starting from the mouth.   Run a line of glue along the peg while closed and position animal with its mouth closed, being careful not to glue it shut.  Glue eye in desired place.  Allow to dry – and there you have it!  So quick and easy I am surprised I have not seen them on Mister Maker!